
Export/Import packages CYPEX applications into portable ZIP archives for migration, backup, and deployment across instances. Export packages contain all application components—UI definitions, queries, workflows, functions, files, reports, users, roles, and optional audit logs—in structured JSON format.
InfoAdvanced Feature: Requires understanding of CYPEX applications, database structures, and environment management. For incremental updates, use Merge Applications or Release Management instead.
- Environment Migration: Move applications between development, staging, and production
- Backup and Recovery: Create application backups for disaster recovery
- Deployment: Deploy applications to new CYPEX instances
- Version Archiving: Archive specific versions for rollback
- Multi-Instance Sync: Synchronize applications across multiple deployments
- Application Sharing: Share applications between teams or organizations
- Selective Export: Choose which components to include (UI, queries, workflows, functions, files, reports, users, roles, audit logs)
- Automatic Validation: Comprehensive checks run before import starts
- Dry-Run Mode: Simulate imports without database changes
- Conflict Resolution: Choose how to handle conflicts (Prompt, Overwrite, or Skip)
- Transaction Control: Select transaction strategy (Per-object, Batch, or Full)
- Real-Time Logging: Monitor operations with detailed progress logs
Export packages are ZIP archives with structured JSON files. Each package contains:
- metadata.json: Application name, version tag, export timestamp, environment
- import_config.json: Default conflict resolution and transaction settings
- checksums.json: SHA-256 checksums for integrity verification
- Component folders: JSON files for UI, queries, workflows, functions, files, reports, users, roles
- README.md: Human-readable export information
TipPackages use JSON format for readability and version control. Suitable for Git repositories and manual inspection.
Conflicts occur when imported data clashes with existing data. Validation identifies conflicts before import starts.
Common conflicts:
- Application names
- Role names
- User accounts (email/login)
- Object definitions
- Parser version mismatches
Resolution options:
- Prompt: Manual resolution per conflict (safest)
- Overwrite: Replace existing data automatically (for updates)
- Skip: Keep existing data, skip conflicting imports (for preservation)
Validation runs automatically on file upload or selection. It checks file structure, parser version compatibility, data conflicts, and estimates performance impact. If validation passes, import starts automatically. If it fails, detailed errors are shown for review.
Choose how database transactions are handled during import:
- Per-object: One transaction per import category (roles, users, UI definition, cypex data, functions, files, etc.) - safest, slower
- Batch: Groups of related import categories per transaction (e.g., roles+users, cypex data+functions) - balanced performance and safety
- Full: Single transaction for entire import - fastest, but rolls back everything on any error
WarningPer-object mode processes each import category in a separate transaction. If importing cypex data (modules, objects, fields, etc.) fails, only that category rolls back while previously completed categories (roles, users) remain imported.
Batch mode groups related categories together for better performance while maintaining reasonable error recovery granularity.
Full mode offers best performance but rolls back the entire import on any error. Use Per-object or Batch mode in production for better error recovery.
This documentation is organized into the following sections:
Main Processes:
- Exporting an Application - Step-by-step guide to packaging and exporting applications
- Importing an Application - Complete guide to restoring applications from export packages
Reference Information:
- Export Package Structure - Detailed structure of export packages
- Understanding Conflicts and Resolution - Conflict types and resolution strategies
- Best Practices - Recommended approaches for exports and imports
- Troubleshooting - Common issues and solutions
- Configuration - Environment variables and settings
- Security and Access Control - Security considerations
The export process packages your application into a ZIP archive containing all selected components, metadata, and configuration files. The export can take several minutes depending on the size of your application.
InfoExport Duration: Export time varies based on application size. Small applications (few components) typically complete in 1-2 minutes, while large applications with many components, files, and audit logs may take 10-15 minutes or longer.
%%{init: {'theme':'base', 'themeVariables': { 'primaryColor':'#153558', 'primaryTextColor':'#fff', 'primaryBorderColor':'#0f253f', 'lineColor':'#40424a', 'secondaryColor':'#4ec1ec', 'tertiaryColor':'#ffb300'}}}%%
graph TB
    A[Start Export] --> B[Select UI Release]
    B --> C[Select Components]
    C --> D[Configure Metadata]
    D --> E[Set Import Config]
    E --> F[Create Package]
    F --> G[Initialize Folders]
    G --> H[Export Metadata]
    H --> I[Export Components]
    I --> J[Generate Checksums]
    J --> K[Create ZIP Archive]
    K --> L{Local Download?}
    L -->|Yes| M[Download to Browser]
    L -->|No| N[Save to Server Tmp]
    M --> O[Export Complete]
    N --> O

    classDef startEnd fill:#153558,stroke:#0f253f,stroke-width:3px,color:#fff
    classDef process fill:#40424a,stroke:#283340,stroke-width:2px,color:#fff
    classDef config fill:#4ec1ec,stroke:#3ba8d4,stroke-width:2px,color:#153558
    classDef action fill:#009688,stroke:#00796b,stroke-width:2px,color:#fff
    classDef decision fill:#ffb300,stroke:#ff8f00,stroke-width:2px,color:#153558
    classDef success fill:#009688,stroke:#00796b,stroke-width:3px,color:#fff

    class A,O startEnd
    class B,C,D,E config
    class F,G,H,I,J,K process
    class L decision
class M,N action- Navigate to Admin Panel → Applications
- Locate the application you want to export in the applications list
- Click the Export icon next to the application name
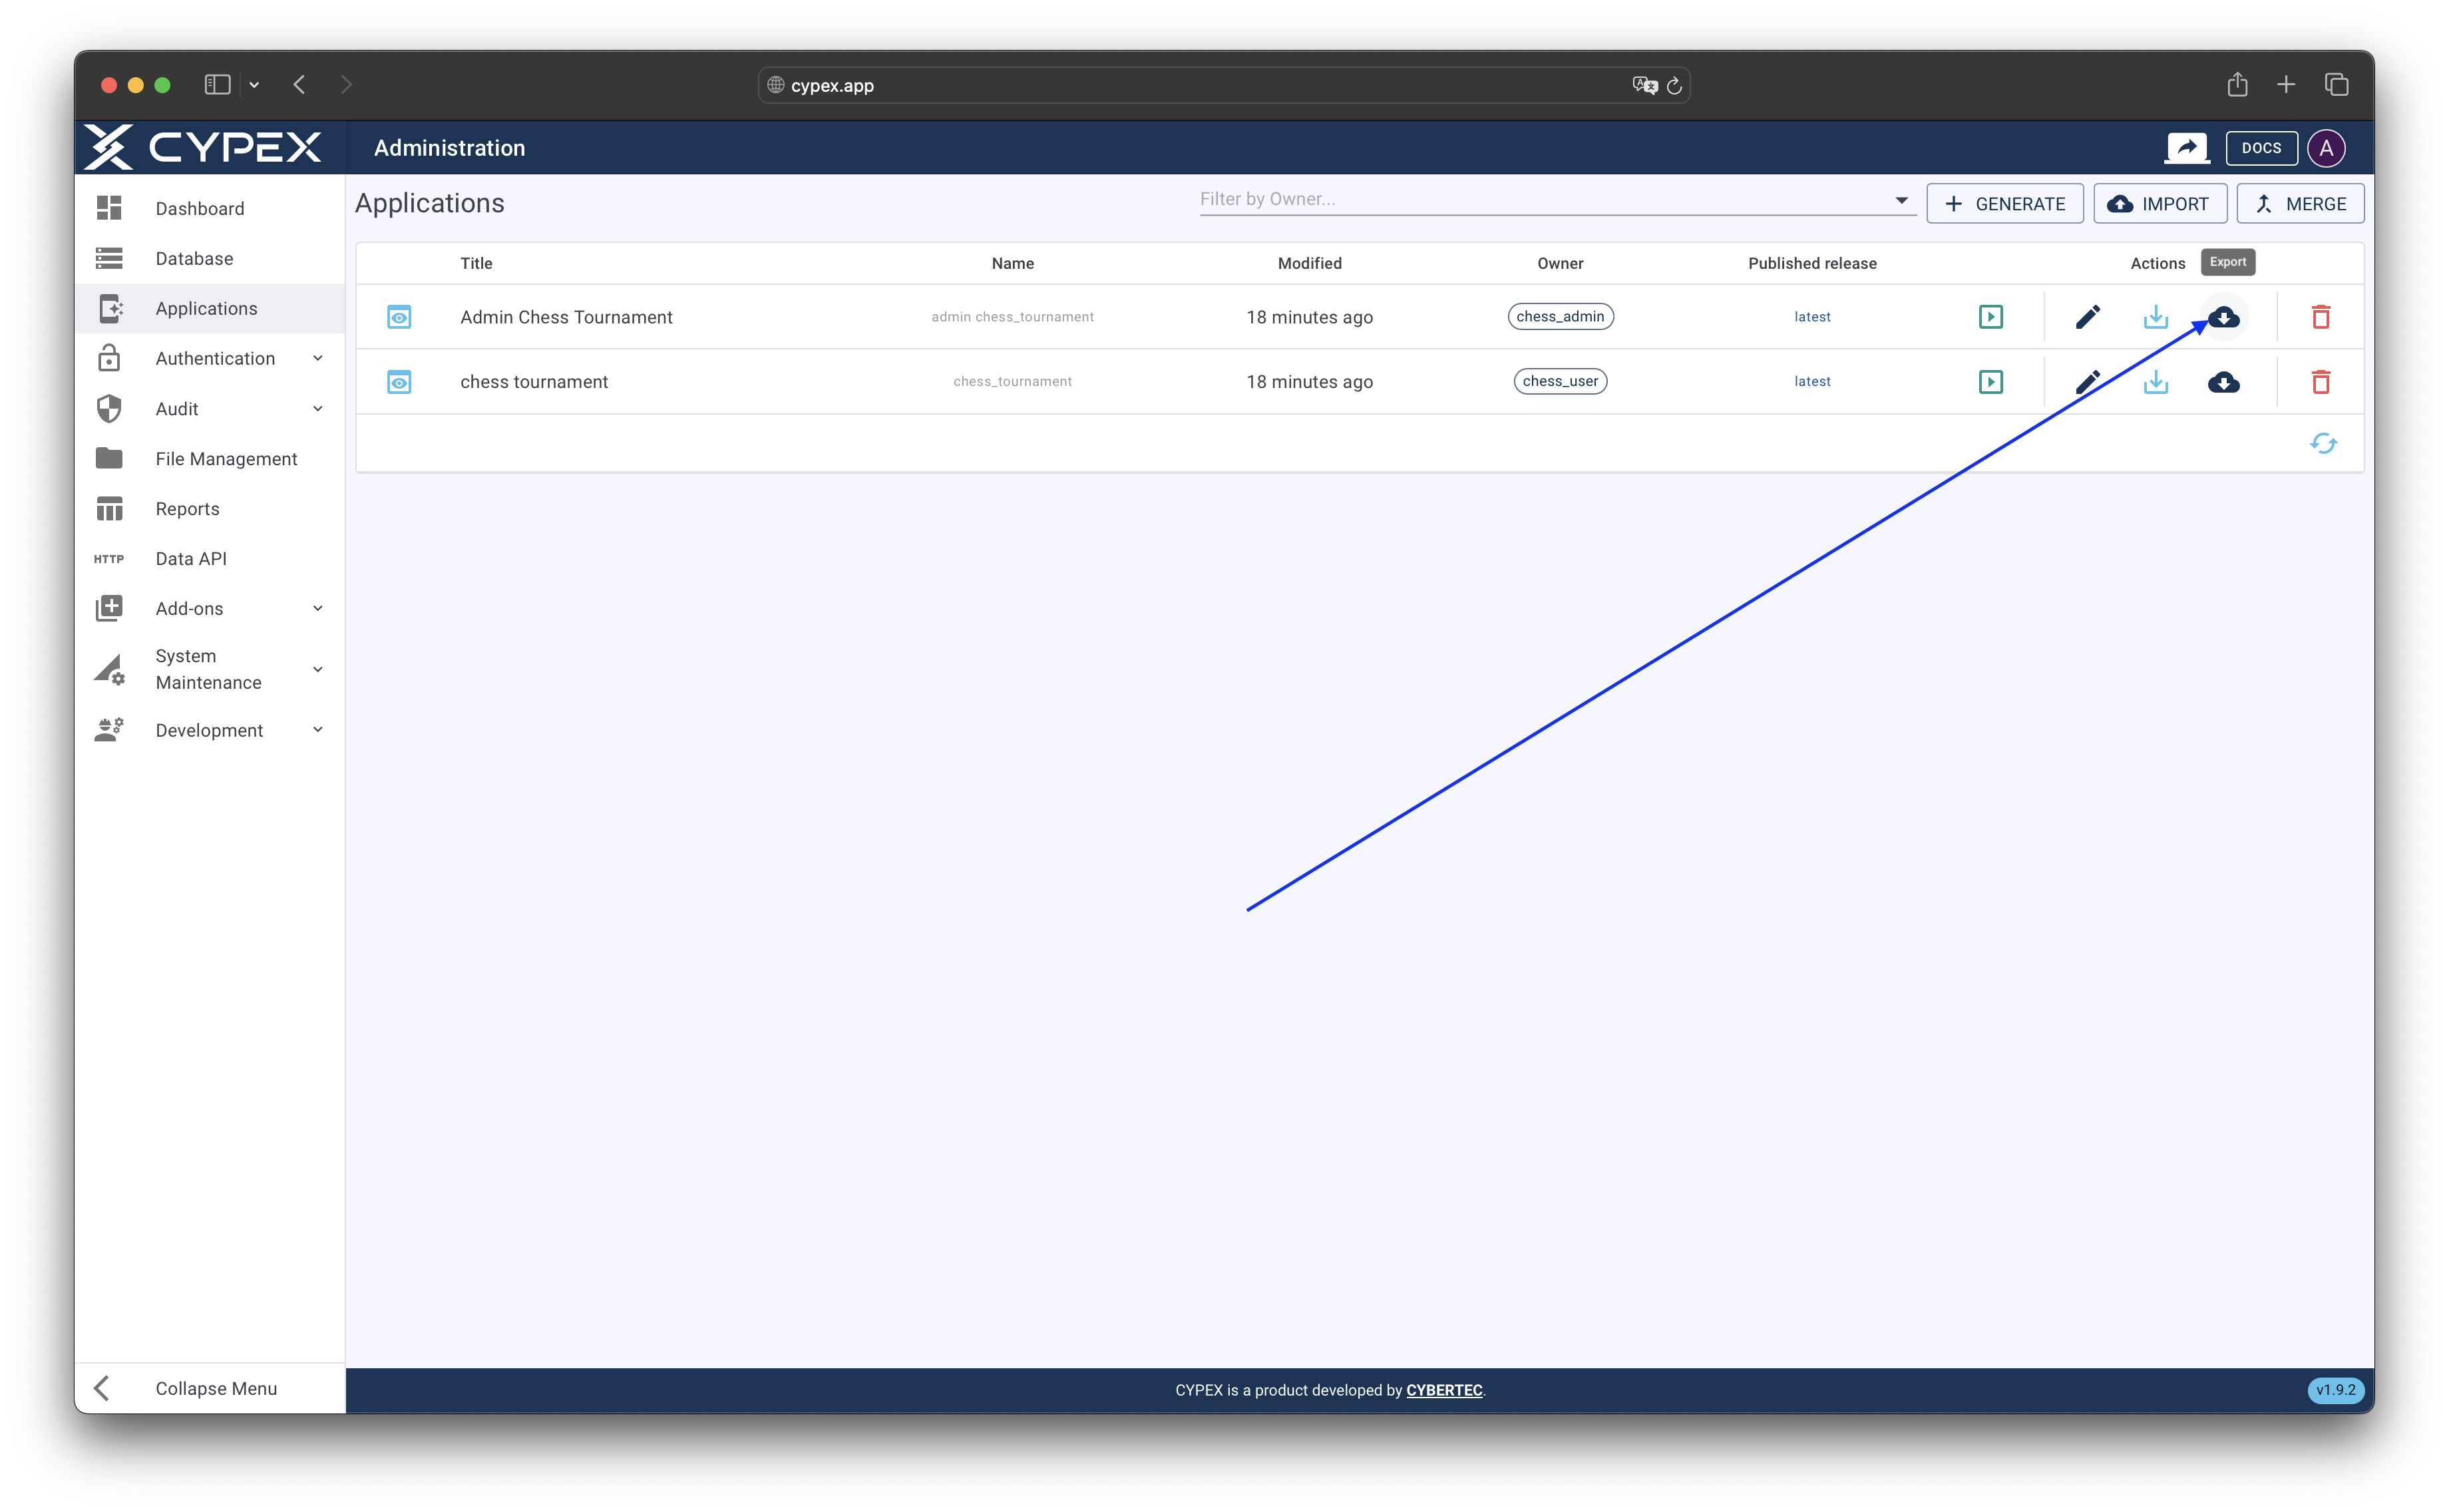
Applications list with export icon
Click the export icon next to the application name to start the export process
The export page presents a step-by-step wizard to configure your export:
Choose which UI release to include in the export:
- Use Existing Release: Select from your published or saved releases. The system will pre-select the latest published release if available.
- Create New Release: Export the current application state as a new release
TipBest Practice: Using an existing published release ensures consistency and reproducibility. Creating a new release captures the current state, which may include unsaved changes or work-in-progress modifications.
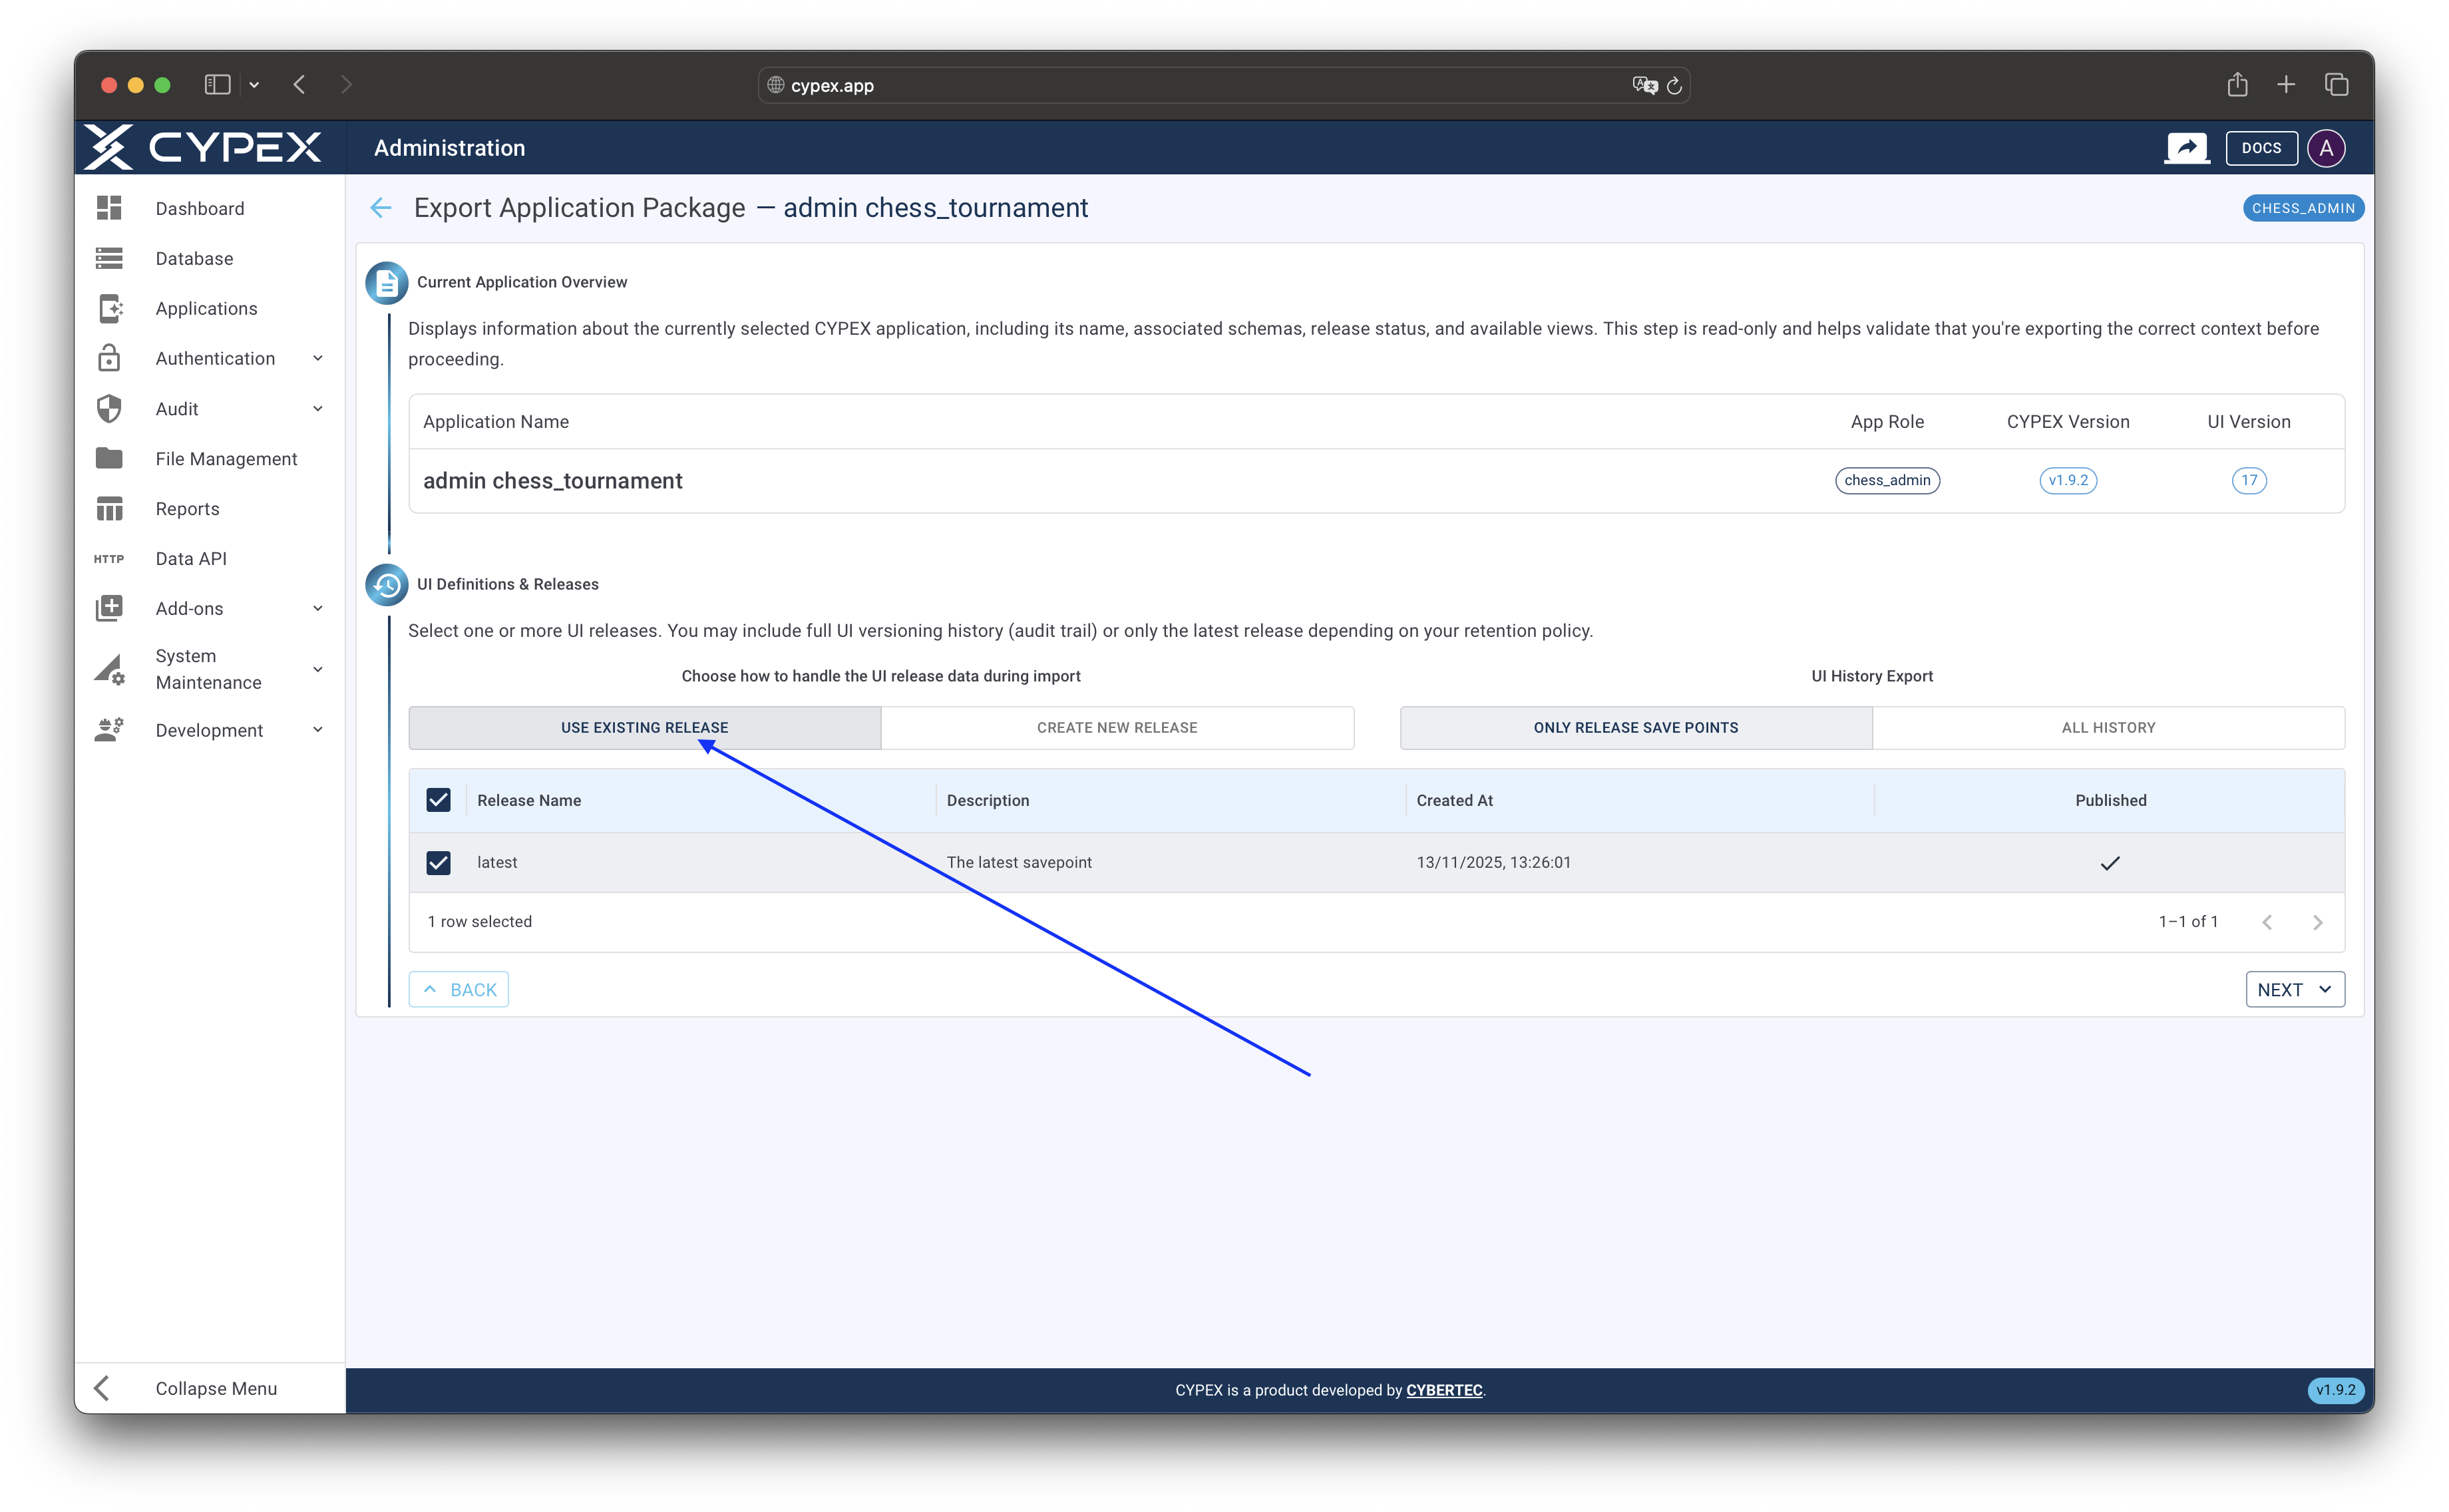
UI release selection
Select an existing release or create a new one for the export
Configure which application components to include in the export package:
- UI: Application pages, layouts, and UI element definitions
- Users: User accounts and their role mappings
- Queries: Database queries and their permissions
- Workflow: Workflow definitions and state transition rules
- Functions: Custom functions and stored procedures
- Files: File metadata and binary content stored in the database
- Reports: Reports created from UI and saved in database
TipPerformance Tip: Selecting fewer components reduces export size and processing time. Only include components needed for your target environment. Excluding audit logs and system data can significantly reduce package size.
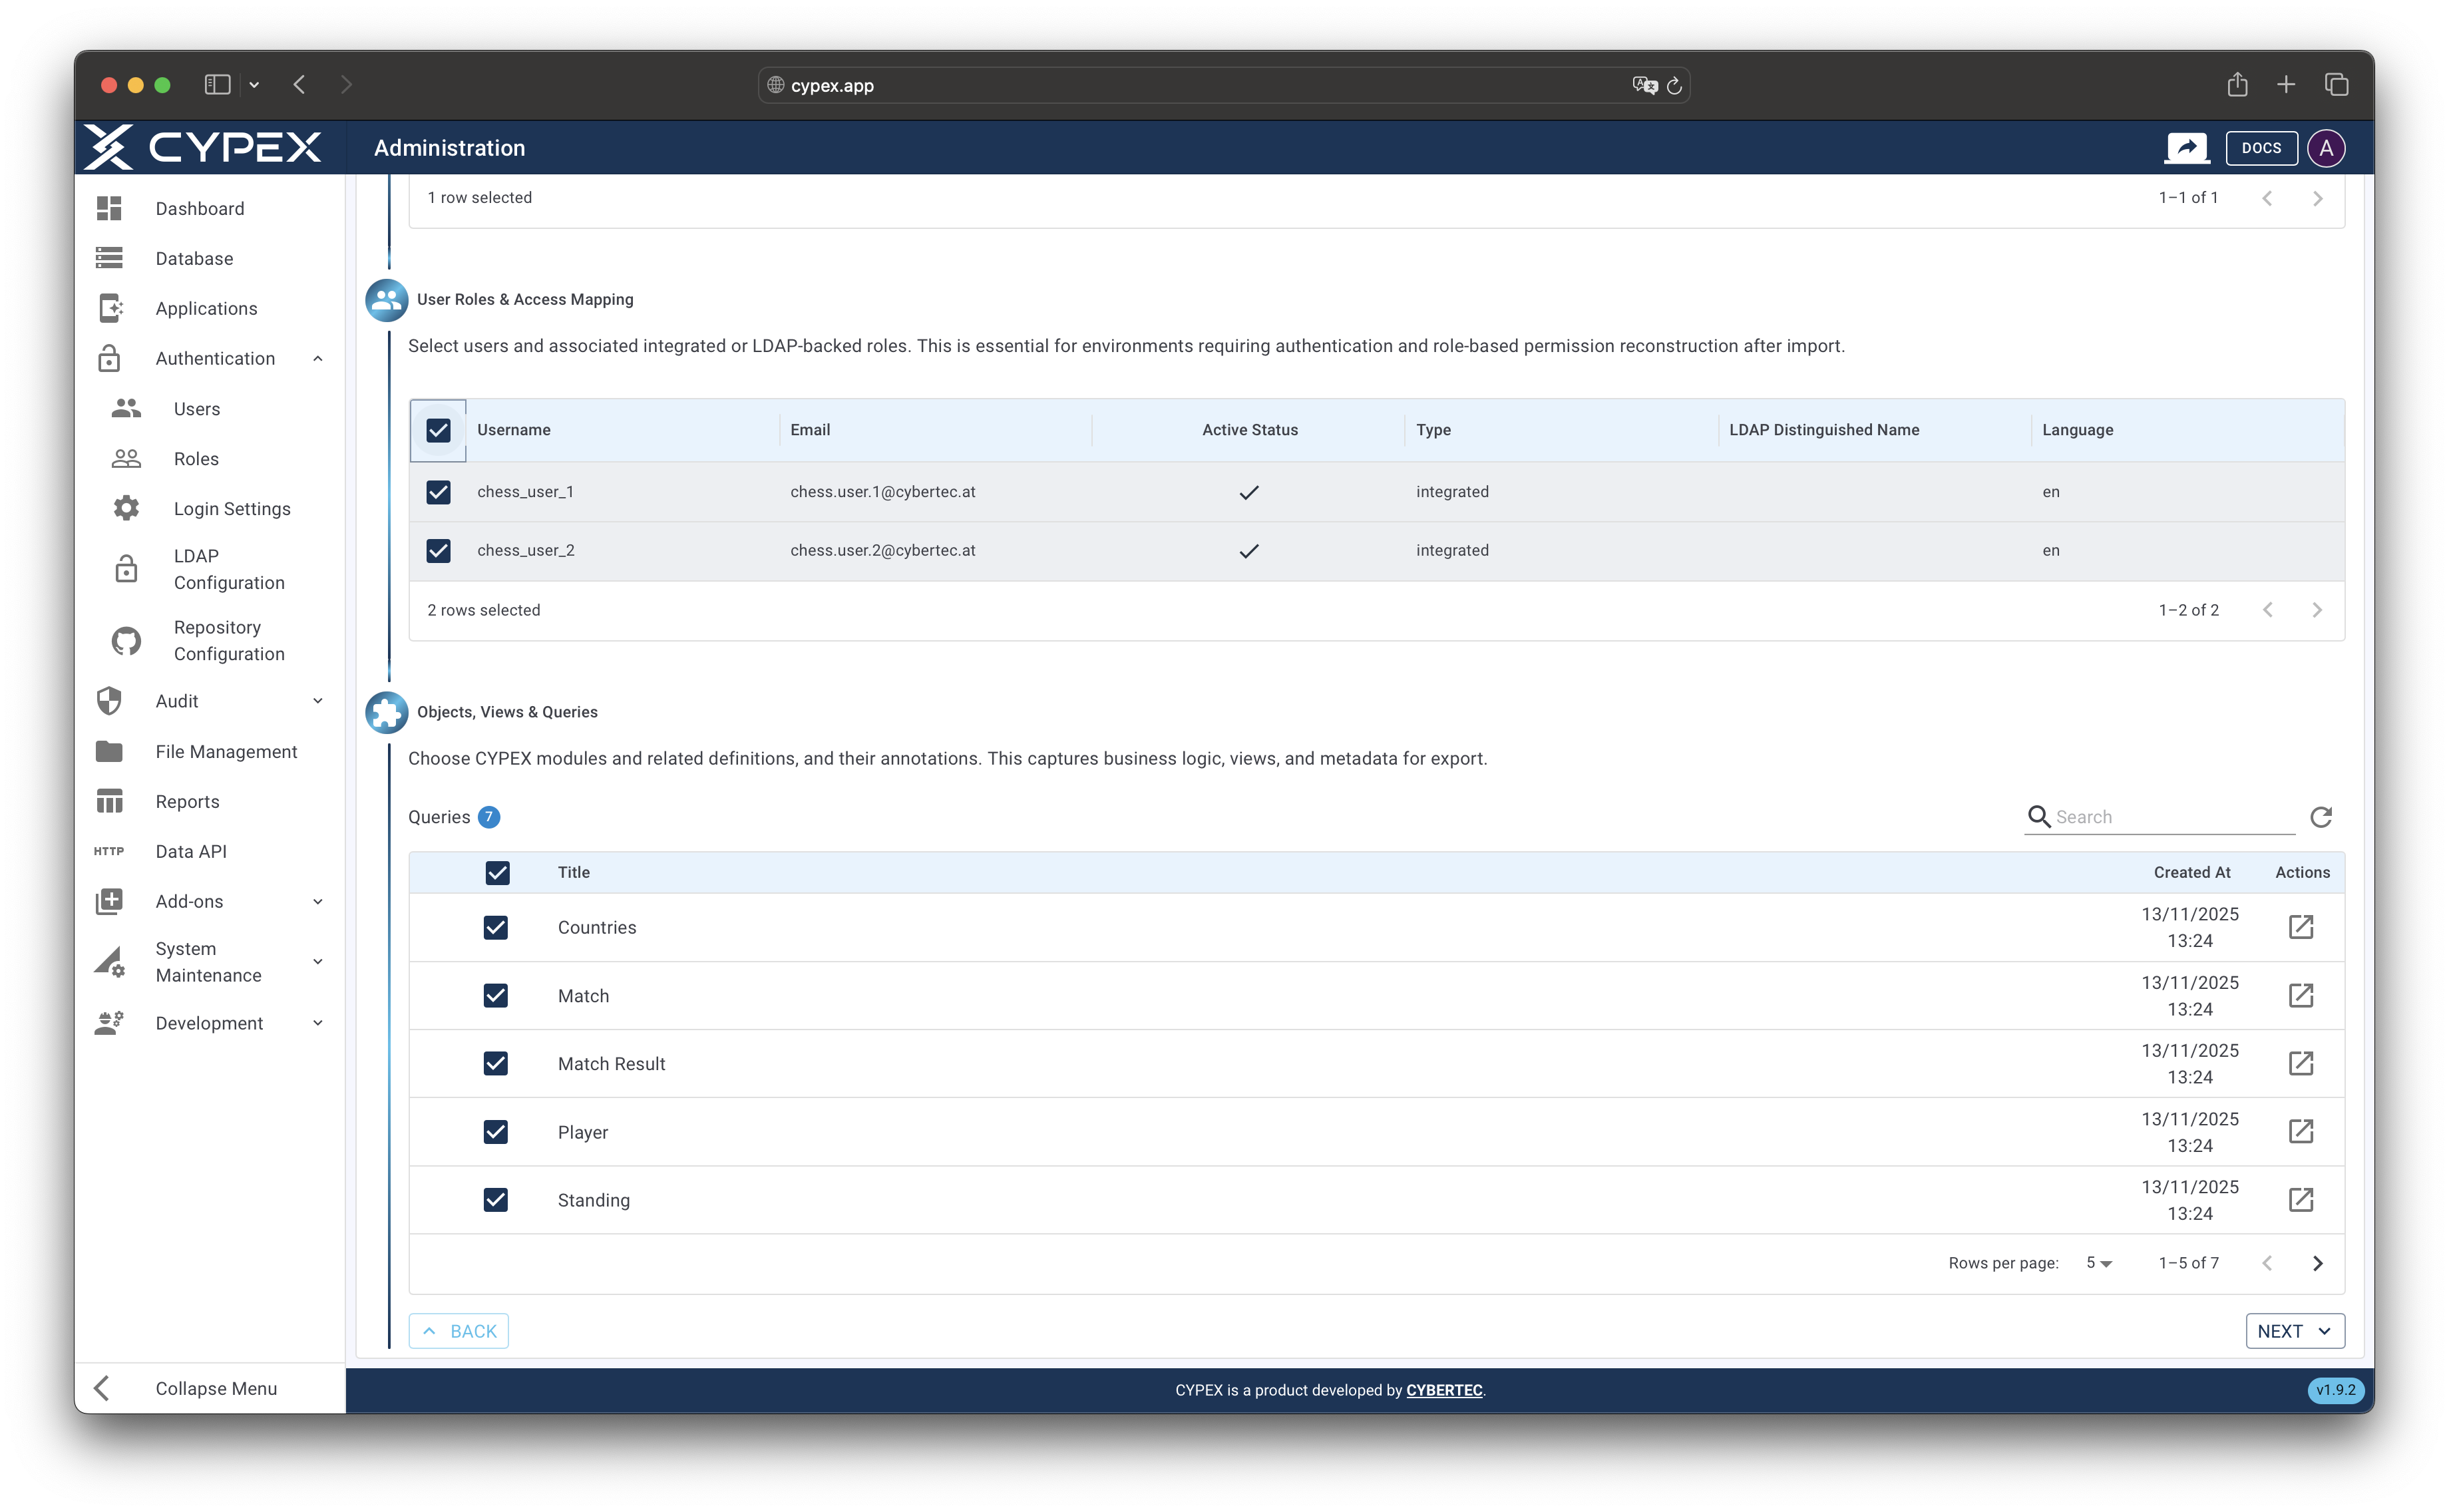
Component selection
Select which application components to include in the export package
Configure default settings that will be used when importing this package:
- Conflict Resolution:
- Prompt: Require manual resolution for each conflict (safest)
- Overwrite: Automatically replace existing data with imported data
- Skip: Keep existing data and skip conflicting imports
- Transaction Mode:
- Per-object: Each object imported in its own transaction (safest, slower)
- Batch: Groups of objects in transactions (balanced performance and safety)
- Full: Single transaction for entire import (fastest, requires rollback on any error)
- Additional Options:
- Allow Role Creation: Create new roles if they don’t exist
- Allow Object Ownership Change: Transfer object ownership during import
- Verify Integrity: Validate checksums to ensure file integrity
- Include System Data: Include audit logs and internal settings (increases package size)
Provide information about this export:
- Application Name: Automatically filled from the application
- Tag/Version: Version identifier (e.g., “1.0.0”, “production-v2”). Follow semantic versioning for clarity.
- Environment: Select DEV, STAGING, or PROD to indicate the source environment
- Exported By: Your username (automatically filled)
- Notes: Optional description of changes or purpose of this export
- Local Download: Enable to automatically download the ZIP file when export completes
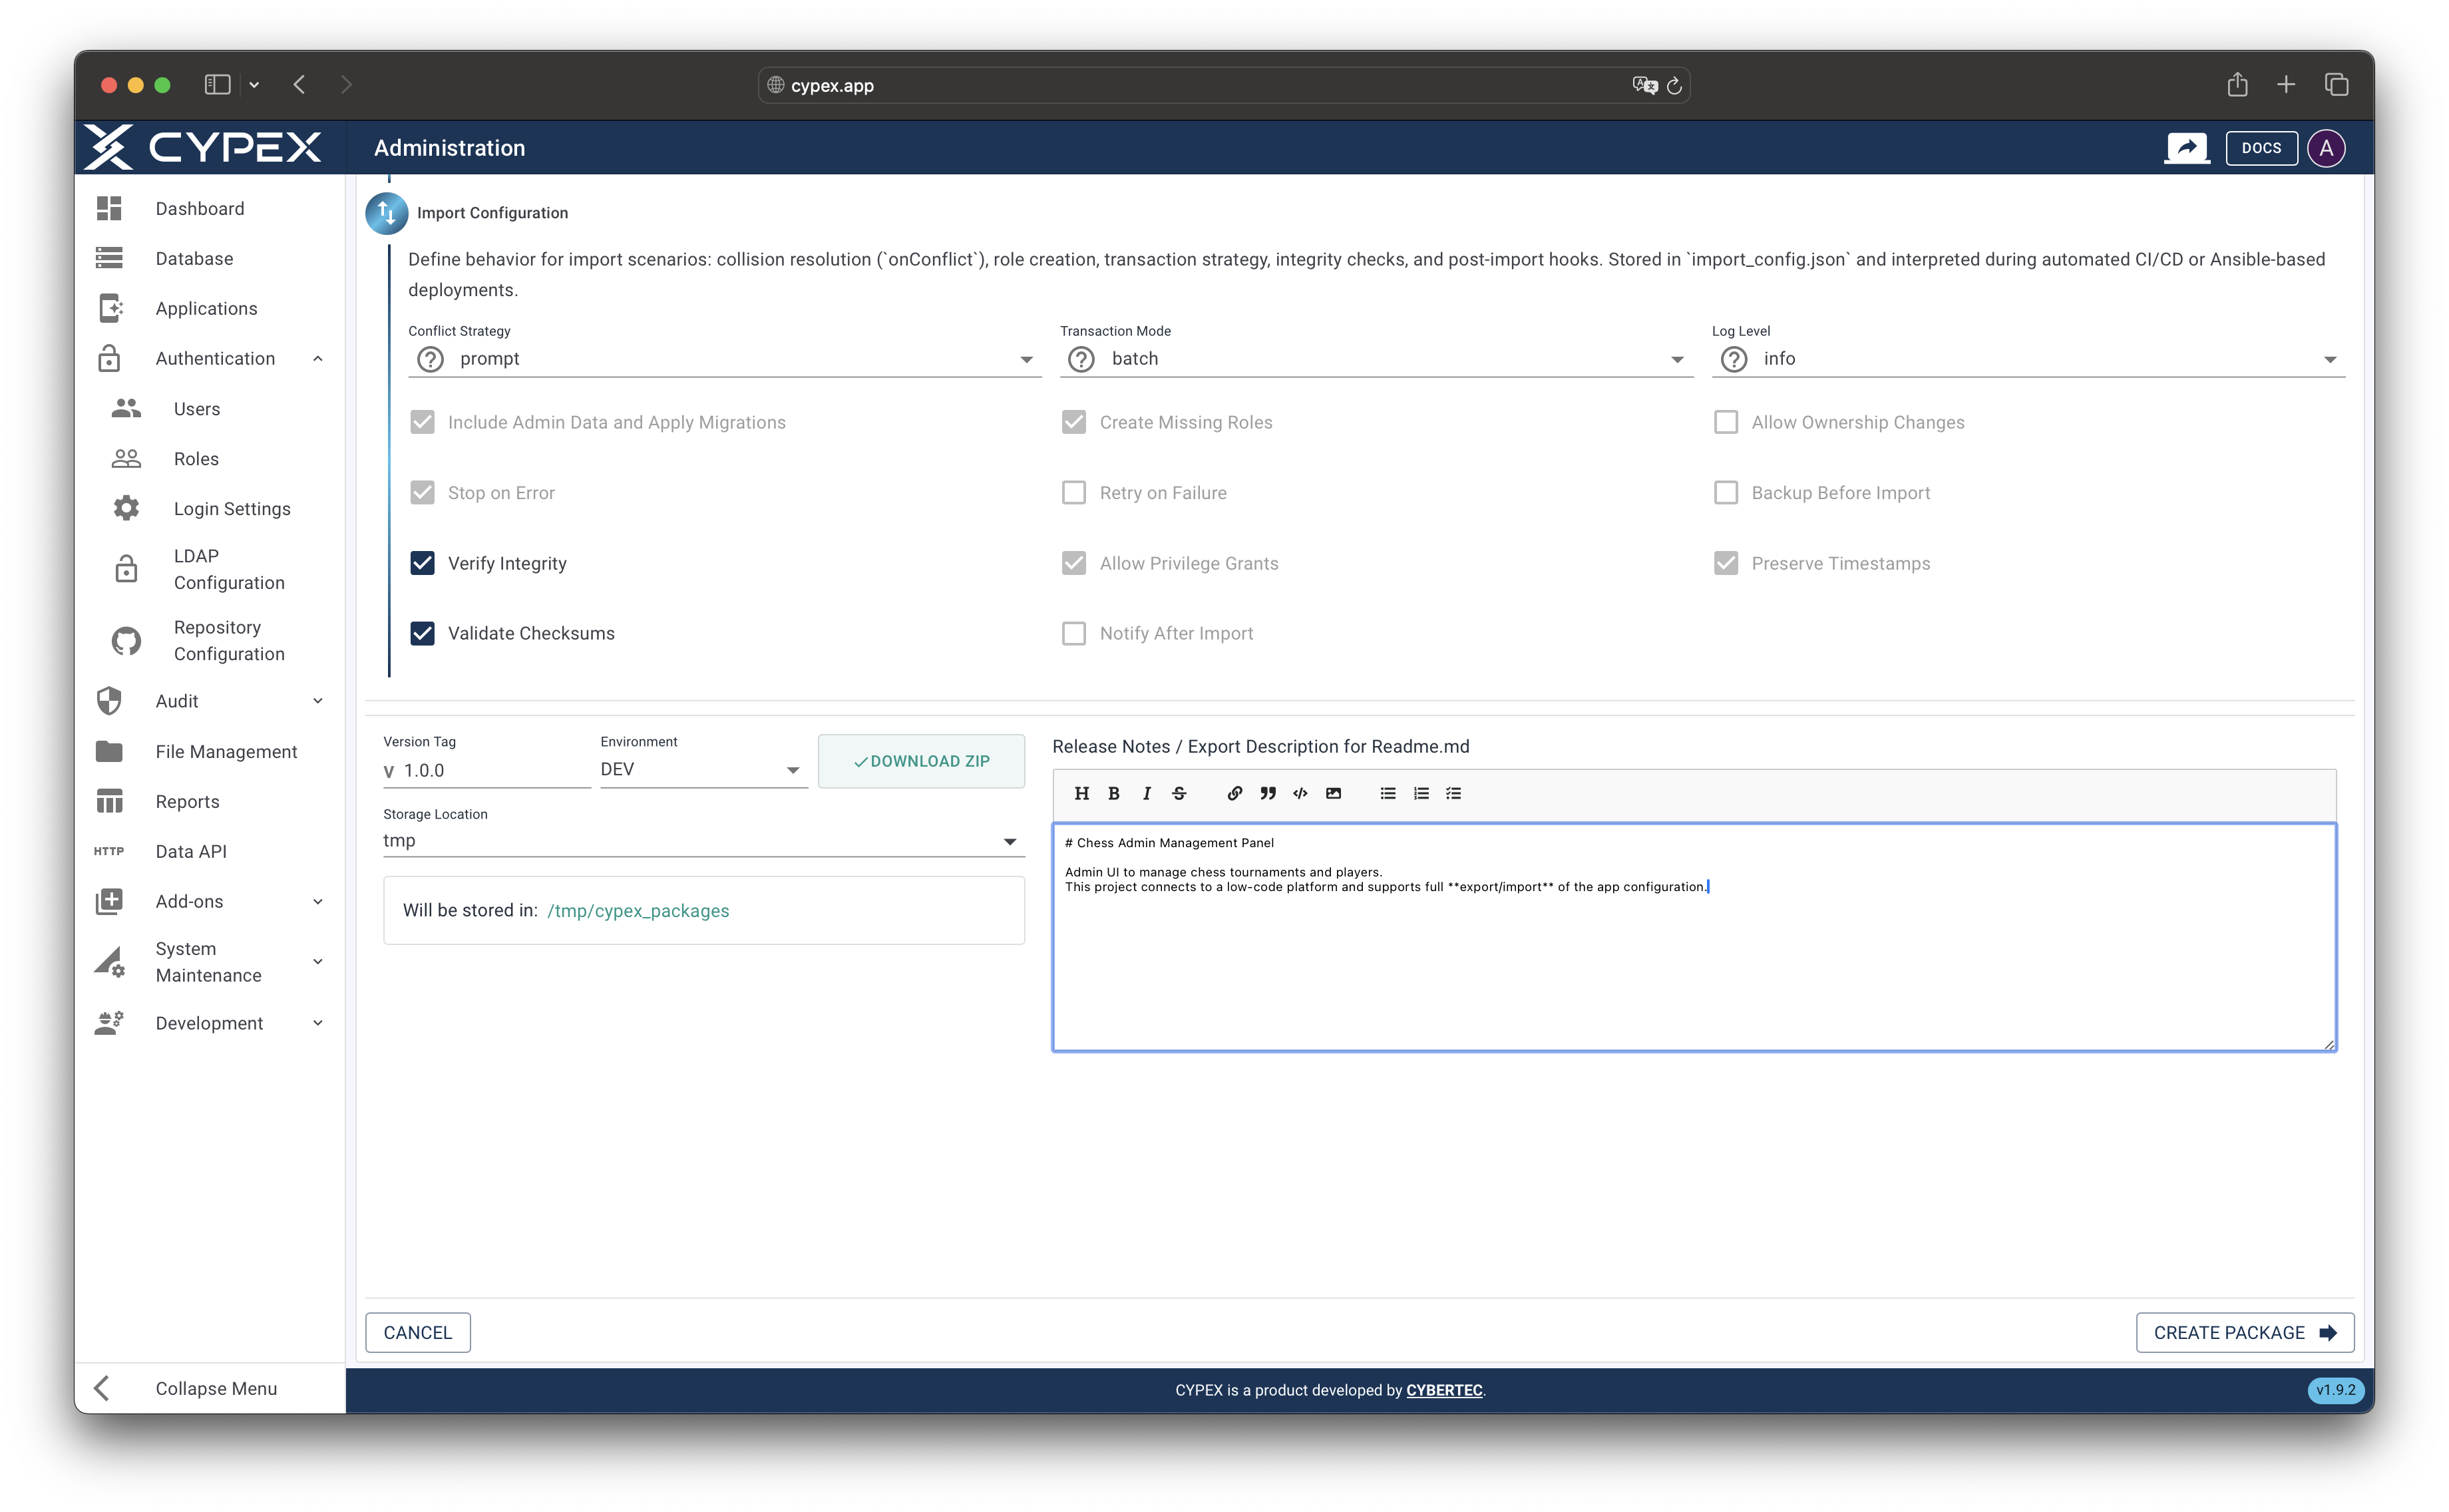
Export metadata form
Provide version information, environment, and optional notes for the export
- Review all configuration settings
- Click Create Package to begin the export process
- The export will run in the background. Monitor progress in the real-time log stream below the form
The export process includes:
- Folder structure initialization
- Metadata export
- Component data export (UI, queries, workflows, etc.)
- Checksum generation for integrity verification
- ZIP archive creation
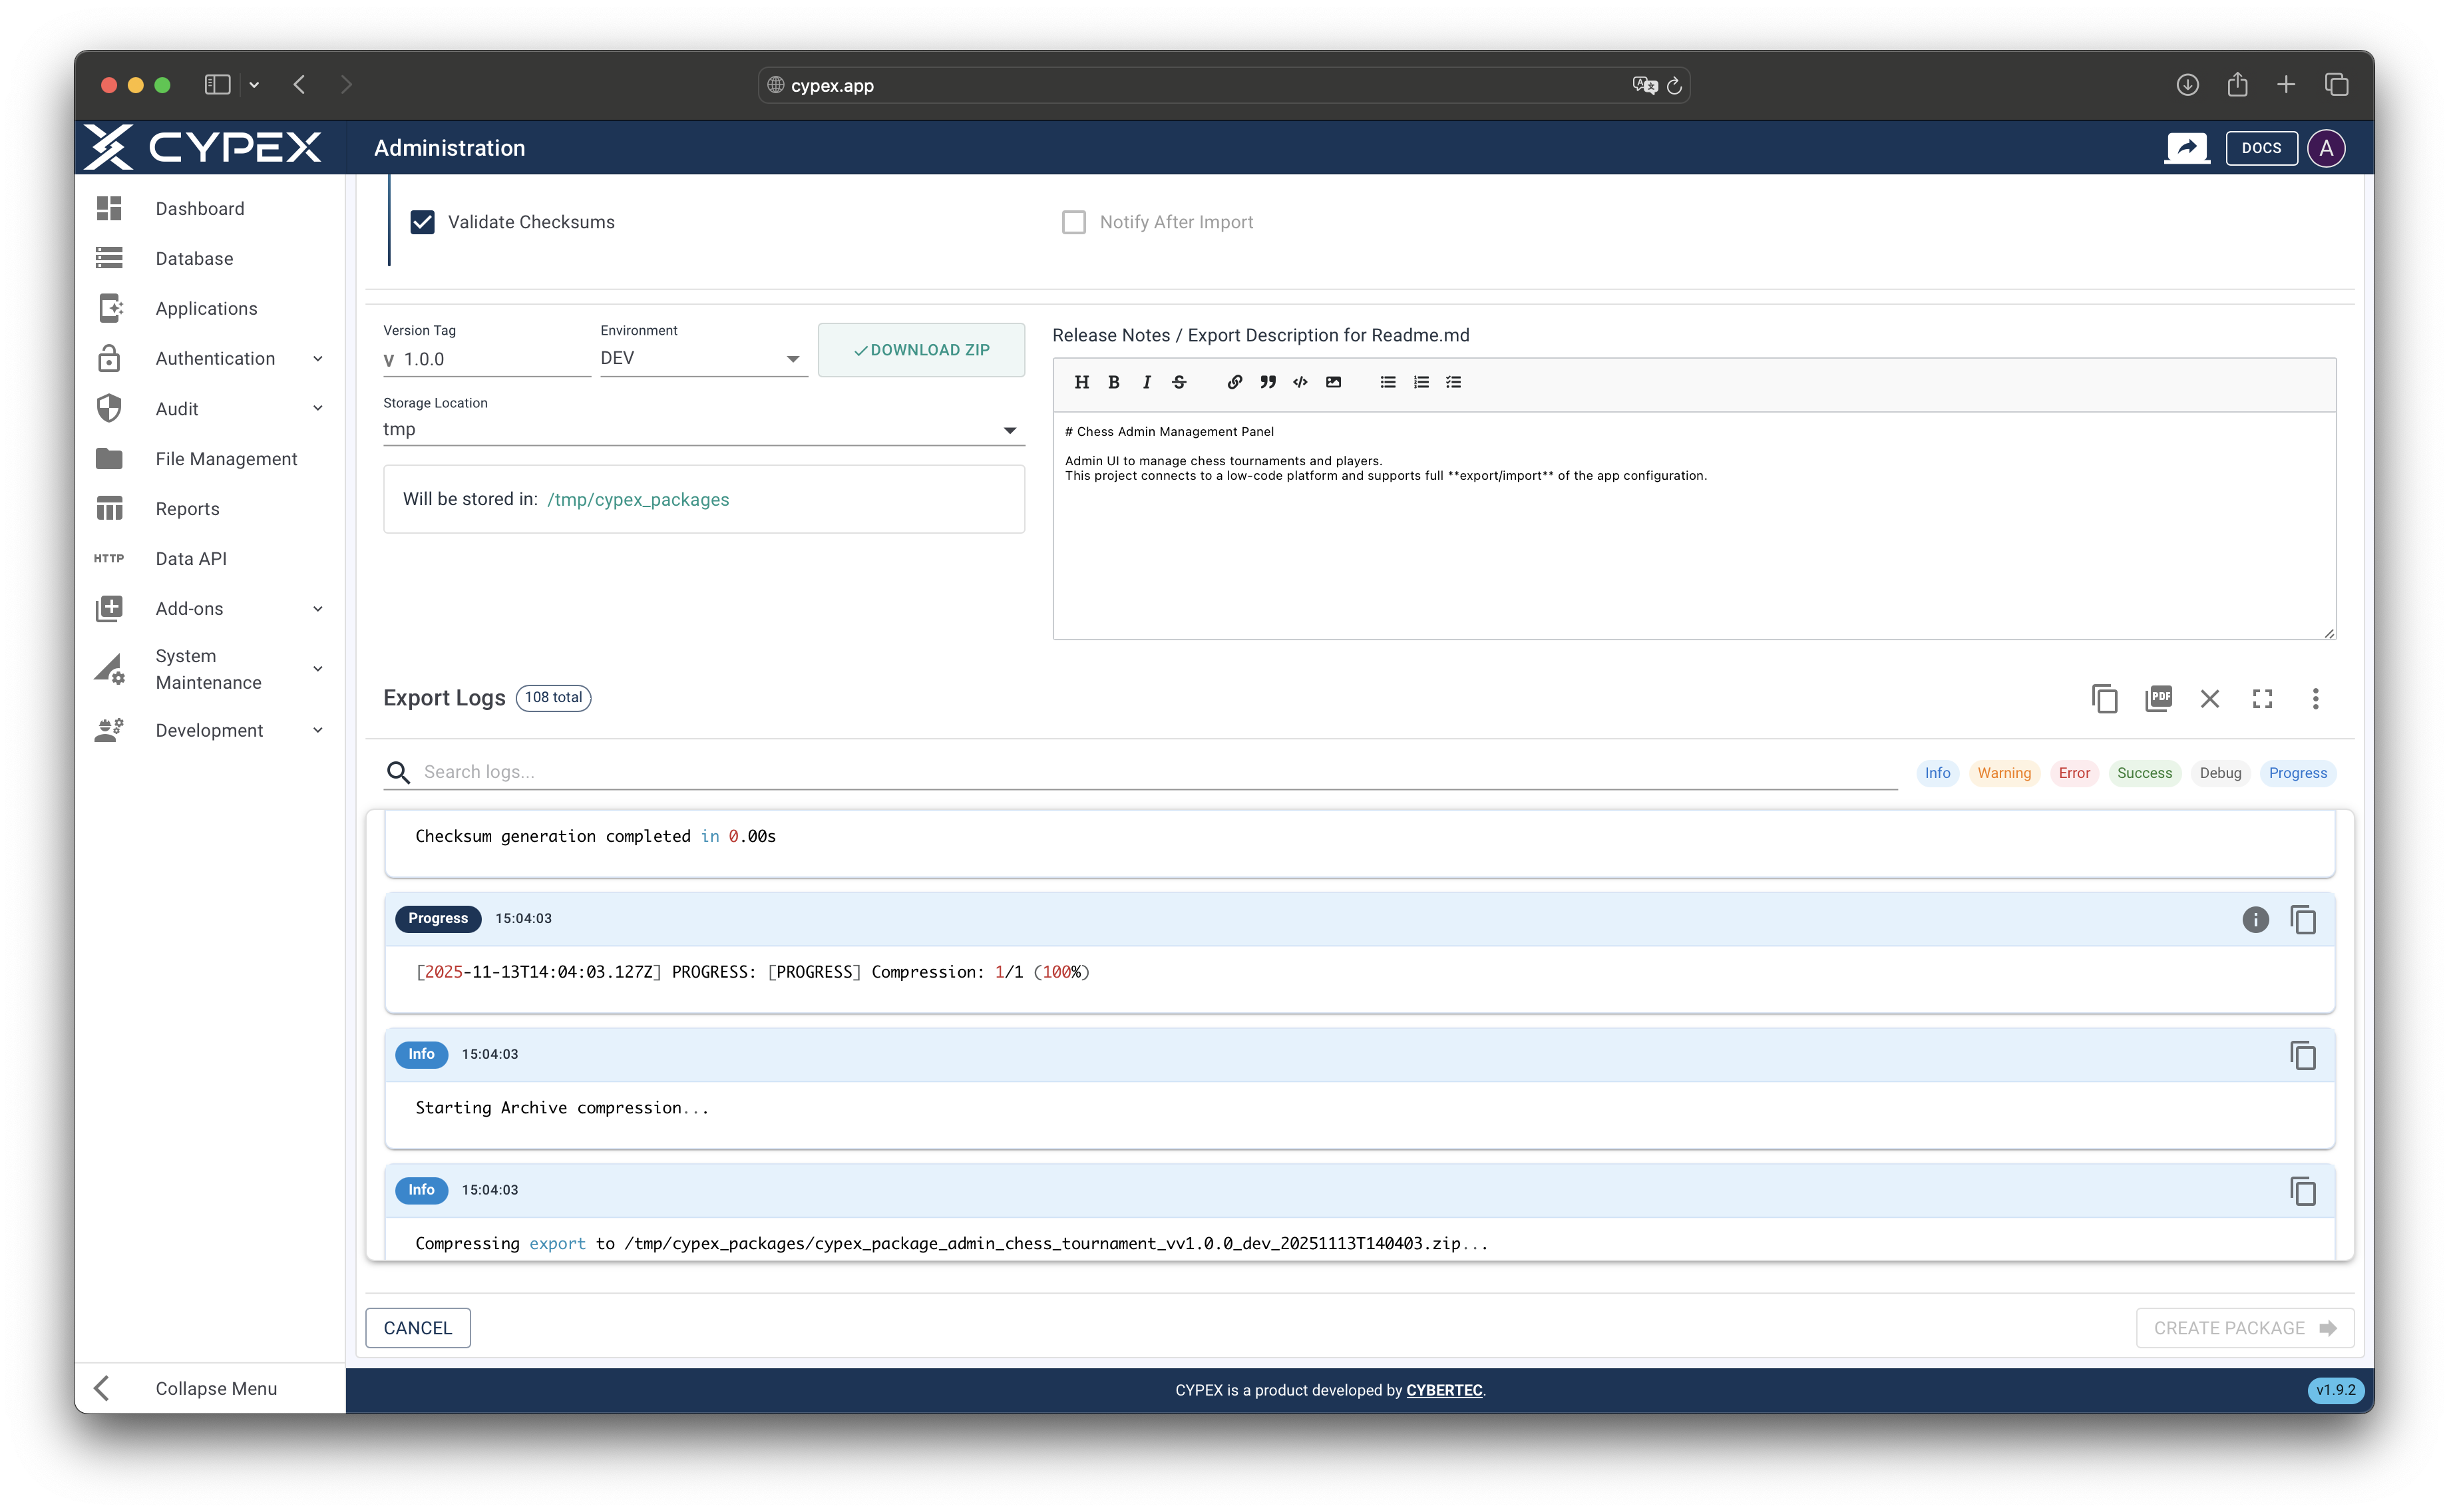
Export progress with log stream
Monitor export progress in real-time through the log stream with detailed progress messages
Export logs can be downloaded as a PDF for documentation and review purposes. The PDF includes all log entries with timestamps, log levels, and formatted messages.
Example Export Logs PDF:
TipPDF Features: The export logs PDF includes color-coded log levels, proper text wrapping, automatic page breaks, and professional formatting. You can download the PDF directly from the export interface using the PDF download button.
Once the export completes successfully:
- If Local Download was enabled, the ZIP file downloads automatically to your browser’s download folder
- The export file is also saved to the server’s temporary directory (
/tmpby default, configurable viaTMP_CYPEX_PACKAGE_DIR) for later access - Export job status is recorded in the database for audit purposes
WarningImportant: Export files in the temporary directory are automatically cleaned up after a period of time. Always download important exports to a safe, permanent location for backup and version control purposes.
The import process restores an application from an exported ZIP package. Validation runs automatically when you upload or select a file. If validation passes, the import starts automatically. You can also run a dry-run to simulate the import before execution.
InfoAutomatic Validation: The system performs comprehensive validation checks automatically. If validation passes, the import starts immediately. If validation fails, detailed error information is displayed for review.
%%{init: {'theme':'base', 'themeVariables': { 'primaryColor':'#153558', 'primaryTextColor':'#fff', 'primaryBorderColor':'#0f253f', 'lineColor':'#40424a', 'secondaryColor':'#4ec1ec', 'tertiaryColor':'#ffb300', 'errorBkgColor':'#ef5350', 'errorTextColor':'#fff'}}}%%
graph TB
    A[Select Import Source] --> B{Source Type}
    B -->|Upload ZIP| C[Upload File]
    B -->|Tmp Folder| D[Select from Tmp]
    C --> E[Automatic Validation]
    D --> E
    E --> F{Validation Pass?}
    F -->|No| G[Display Errors]
    G --> H[Review Logs]
    H --> I[Fix Issues]
    I --> C
    F -->|Yes| J{Run Dry-Run?}
    J -->|Yes| K[Simulate Import]
    K --> L[Review Results]
    L --> M[Execute Import]
    J -->|No| M
    M --> N[Import Roles]
    N --> O[Import Users]
    O --> P[Import UI]
    P --> Q[Import Data]
    Q --> R[Import Functions]
    R --> S[Import Files]
    S --> T[Import Reports]
    T --> U[Import Audit Logs]
    U --> V[Import Complete]

    classDef start fill:#153558,stroke:#0f253f,stroke-width:3px,color:#fff
    classDef source fill:#4ec1ec,stroke:#3ba8d4,stroke-width:2px,color:#153558
    classDef validation fill:#ffb300,stroke:#ff8f00,stroke-width:2px,color:#153558
    classDef error fill:#ef5350,stroke:#e53935,stroke-width:2px,color:#fff
    classDef decision fill:#40424a,stroke:#283340,stroke-width:2px,color:#fff
    classDef process fill:#009688,stroke:#00796b,stroke-width:2px,color:#fff
    classDef importStep fill:#40424a,stroke:#283340,stroke-width:2px,color:#fff
    classDef success fill:#009688,stroke:#00796b,stroke-width:3px,color:#fff

    class A start
    class B,C,D source
    class E validation
    class F,J decision
    class G,H,I error
    class K,L,M process
    class N,O,P,Q,R,S,T,U importStep
class V success- Navigate to Admin Panel → Applications
- Click the Import Application button
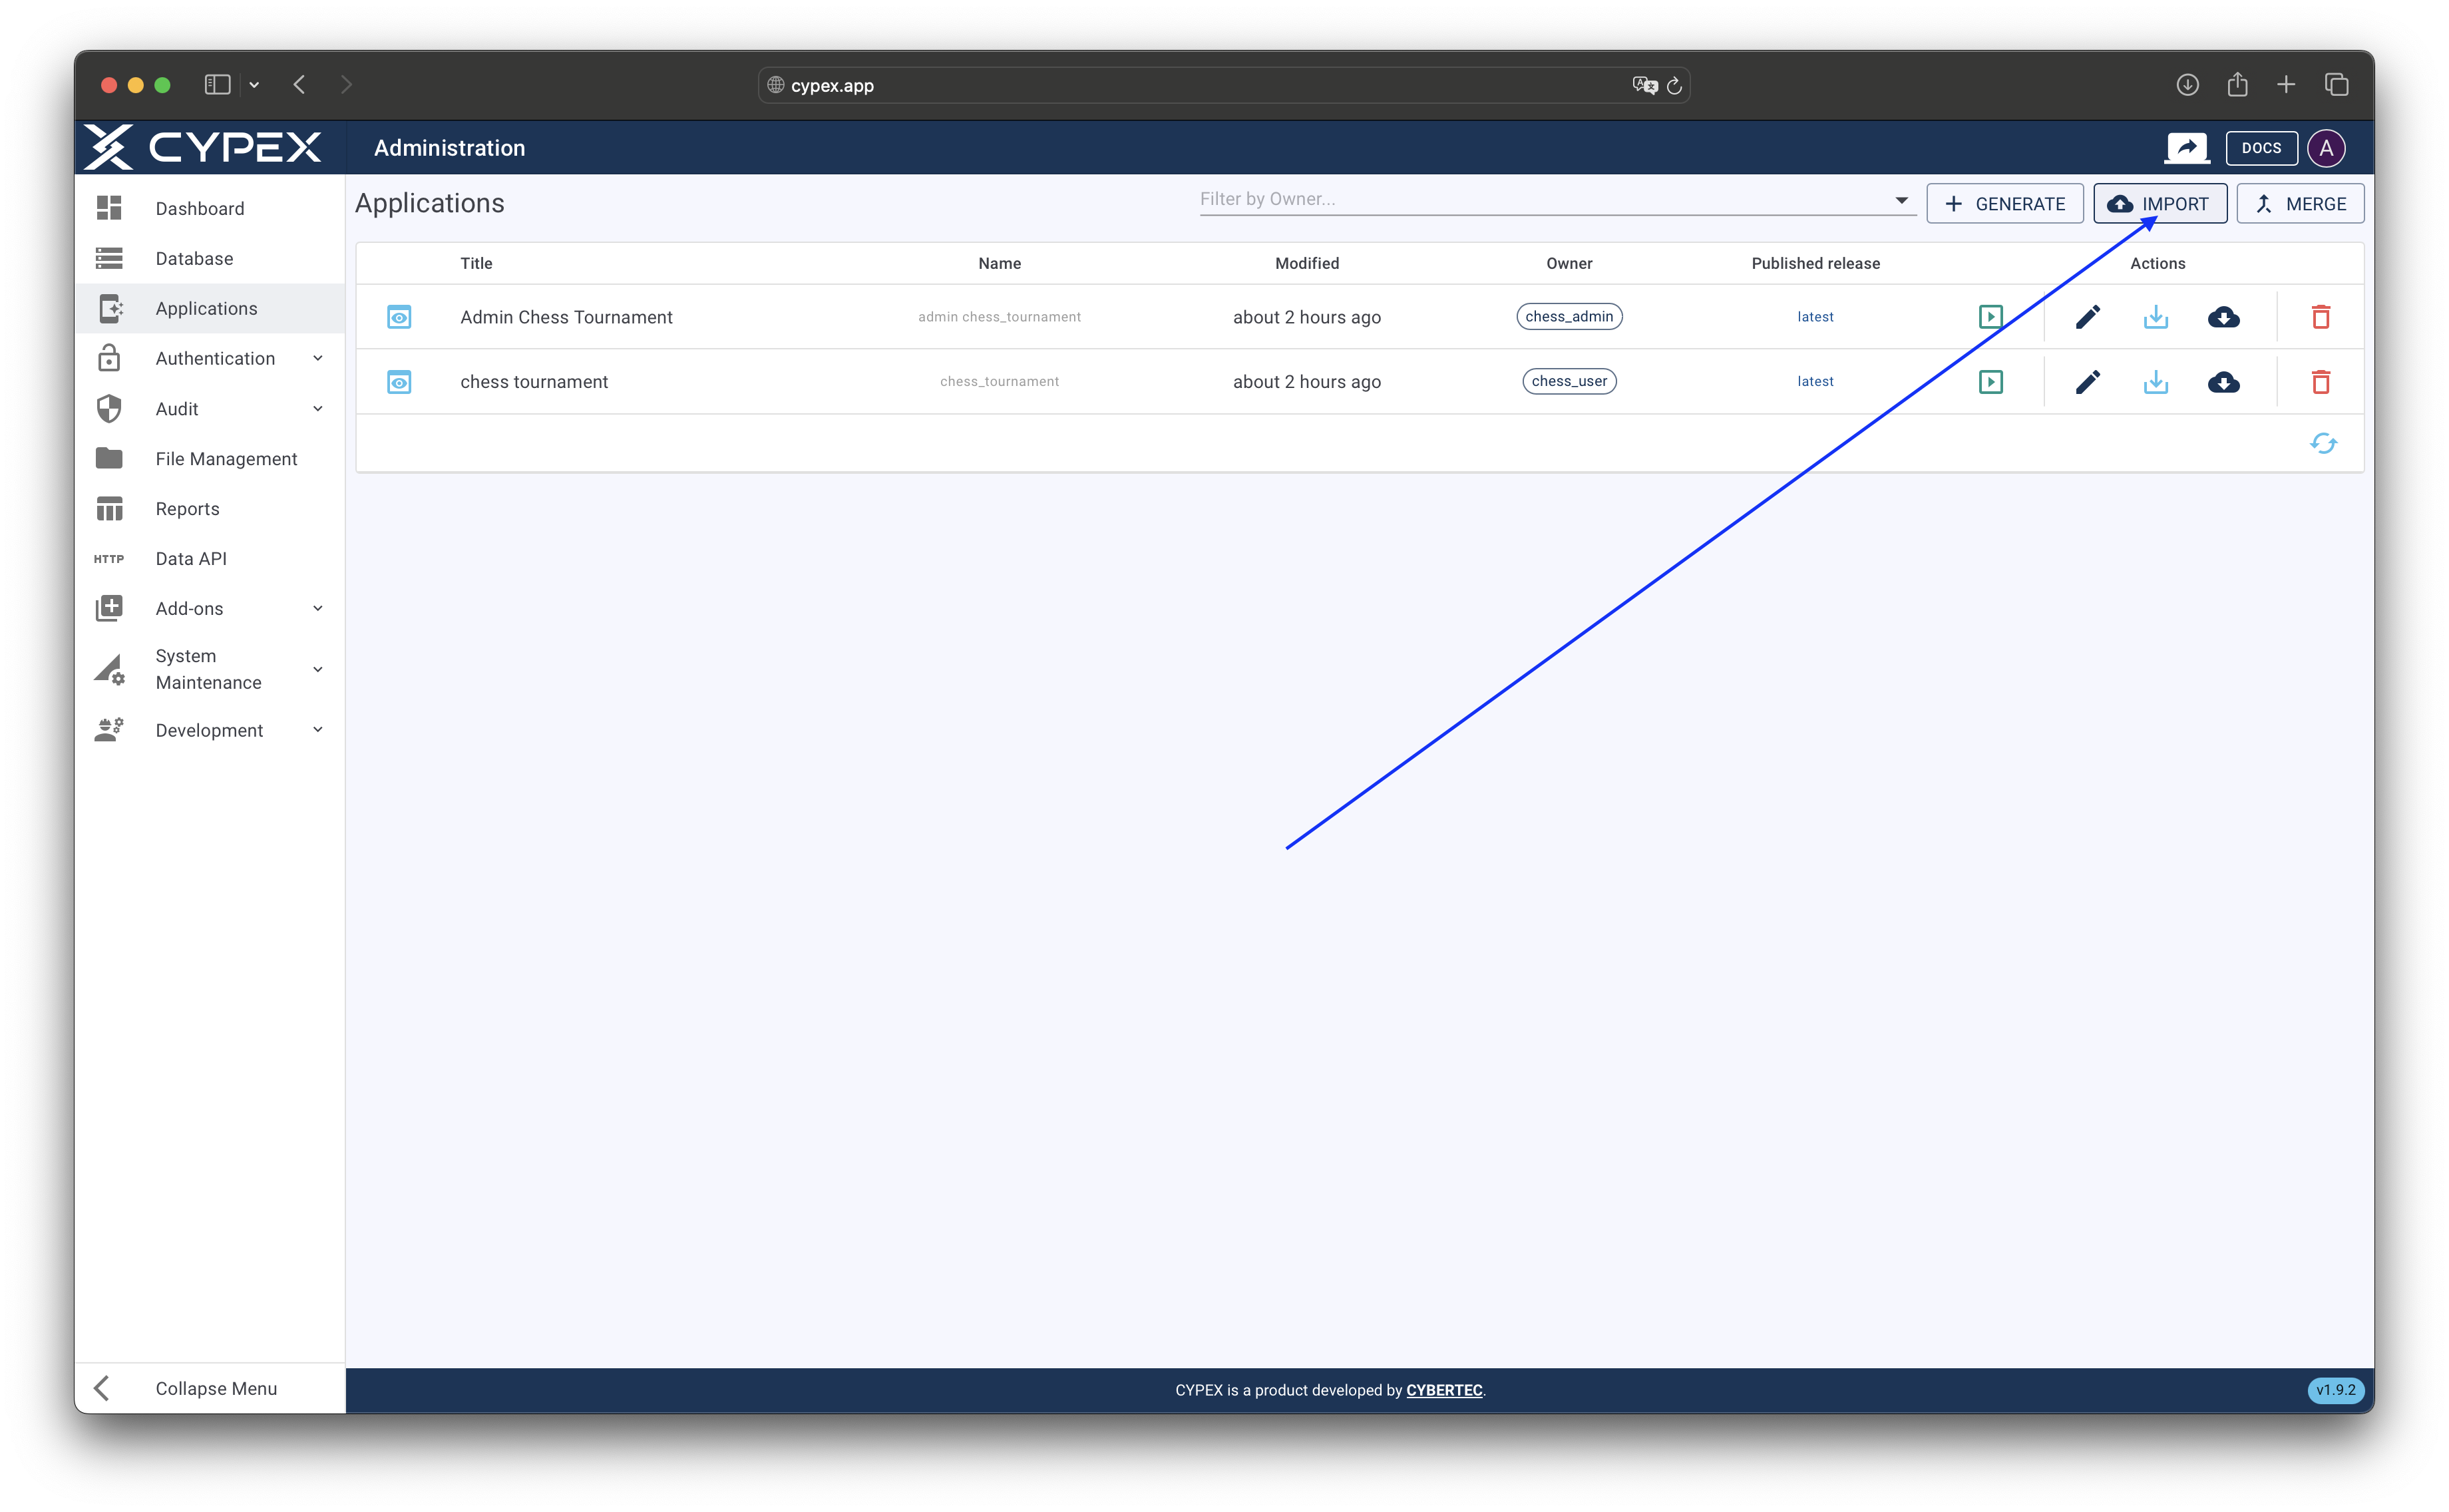
Import Application button
Click the Import Application button to start importing an application package
Choose where to load the application package from:
- Select Upload a zip file as the source type
- Click Choose File and select the export ZIP file from your computer
- The file uploads automatically (default maximum size: 100MB, configurable by administrators)
- After upload, the system automatically:
- Validates the file structure and extracts metadata
- Performs comprehensive validation checks
- If validation passes, the import can be processed
- If validation fails, errors are displayed and you can review the logs
InfoLarge File Handling: Files larger than 10MB are streamed to the server to avoid memory issues. Upload progress is displayed during transfer, and you can monitor the upload status in real-time.

ZIP file upload interface
Upload an export package ZIP file from your computer
- Select Import from tmp as the source type
- A list of available ZIP files in the server’s temporary directory is displayed
- Select the desired file from the dropdown
- The system automatically:
- Loads and validates the file structure
- Performs comprehensive validation checks
- If validation passes, the import can be processed
- If validation fails, errors are displayed and you can review the logs
This option is useful when:
- The file was previously uploaded to the server
- You’re importing from a shared server location
- The file is too large for browser upload
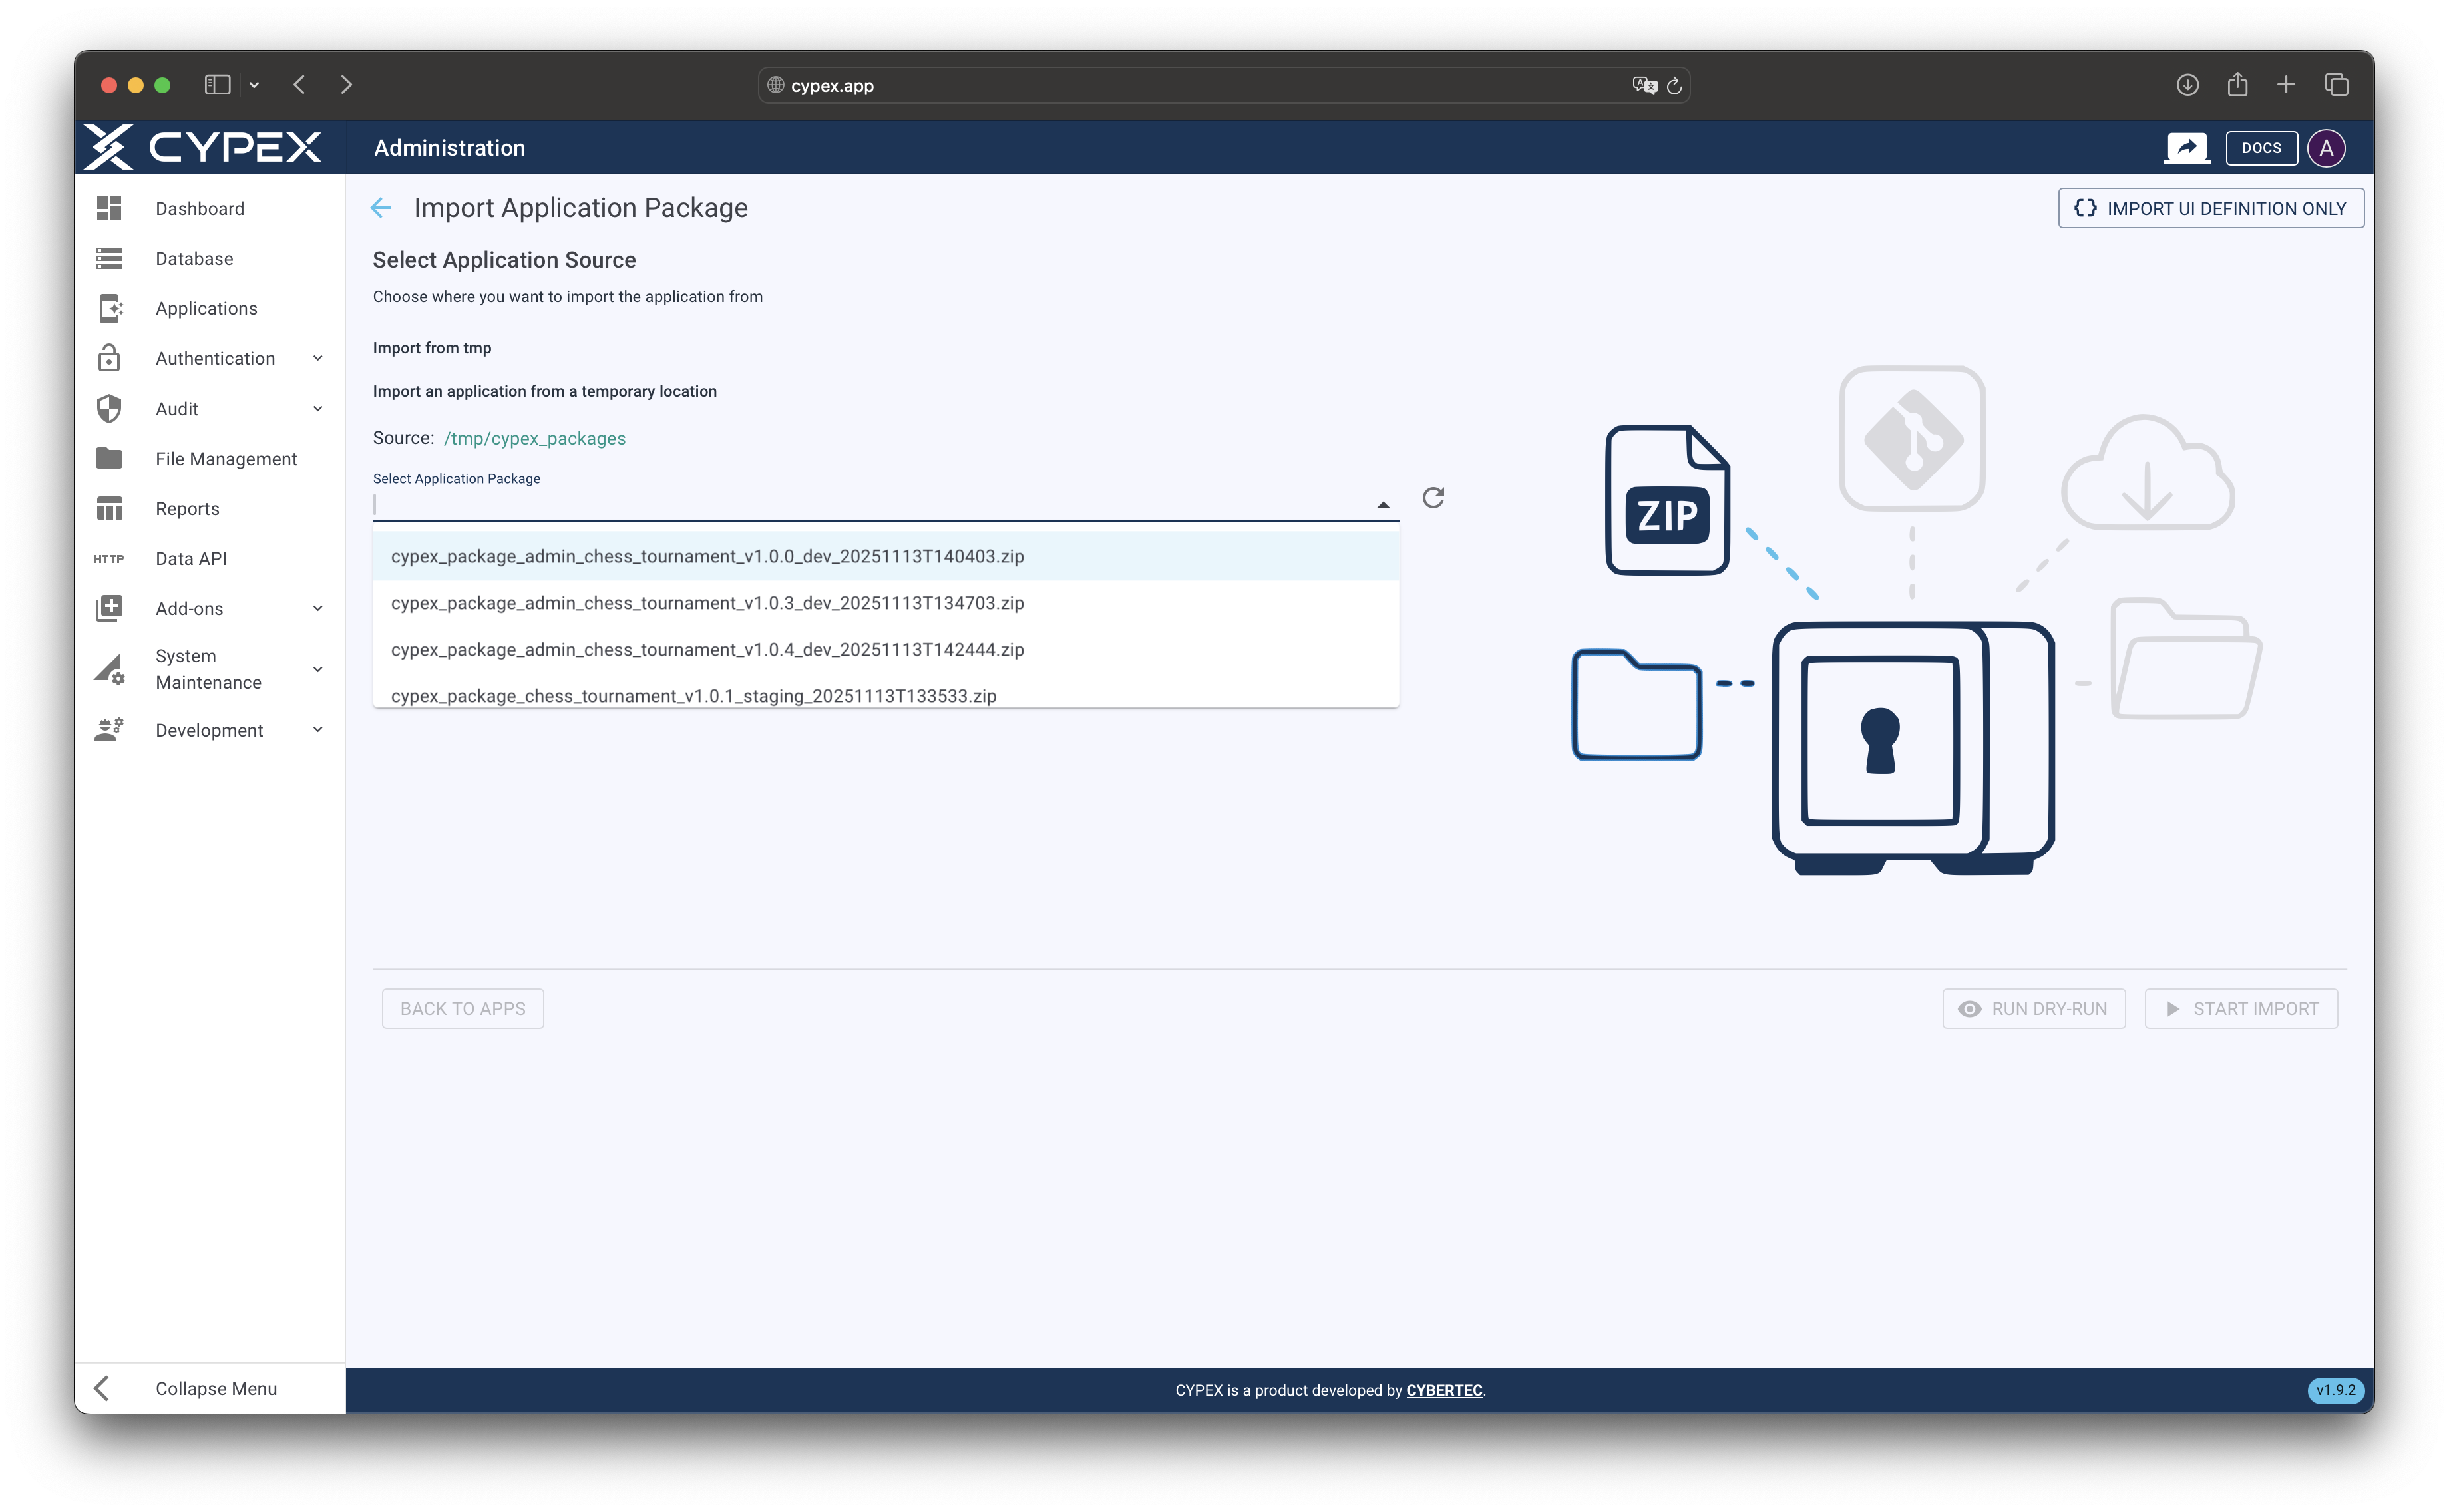
Temporary folder file selection
Select an export package from the server’s temporary directory
InfoFuture Enhancements: Additional import sources (Git repositories, S3 buckets, local archive paths) are planned for future releases. Currently, import is supported via file upload or temporary folder selection.
After selecting a source, the import page displays detailed information about the package:
- Application Metadata: Application name, version tag, source environment, export date
- Export Information: User who created the export, timestamp, and any notes
- Package Contents: Summary of components included in the package
- Import Configuration: Default settings that will be used during import
Review this information carefully to ensure you’re importing the correct application version.

Import information display
Review application metadata, export details, and package contents before proceeding
You can adjust import settings before proceeding. These settings override the defaults stored in the export package:
- Conflict Resolution: Choose how to handle conflicts (Prompt, Overwrite, or Skip)
- Transaction Mode: Select the transaction strategy (Per-object, Batch, or Full)
- Additional Options: Toggle various import behaviors
TipBest Practice: Start with the default settings from the export package. These settings were configured during export and are typically optimal for the application. Only modify settings if you have specific requirements or constraints in your target environment.
Validation runs automatically when you upload a file or select one from the temporary folder. The system performs comprehensive checks without making any database changes:
%%{init: {'theme':'base', 'themeVariables': { 'primaryColor':'#153558', 'primaryTextColor':'#fff', 'primaryBorderColor':'#0f253f', 'lineColor':'#40424a', 'secondaryColor':'#4ec1ec', 'tertiaryColor':'#ffb300', 'errorBkgColor':'#ef5350', 'errorTextColor':'#fff'}}}%%
graph LR
    A[File Upload/Selection] --> B[Validate File Structure]
    B --> C[Check Parser Version]
    C --> D[Identify Data Conflicts]
    D --> E[Estimate Performance]
    E --> F{All Checks Pass?}
    F -->|Yes| G[Start Import]
    F -->|No| H[Display Errors]
    H --> I[Review Logs]

    classDef start fill:#153558,stroke:#0f253f,stroke-width:3px,color:#fff
    classDef check fill:#4ec1ec,stroke:#3ba8d4,stroke-width:2px,color:#153558
    classDef decision fill:#ffb300,stroke:#ff8f00,stroke-width:2px,color:#153558
    classDef success fill:#009688,stroke:#00796b,stroke-width:3px,color:#fff
    classDef error fill:#ef5350,stroke:#e53935,stroke-width:2px,color:#fff

    class A start
    class B,C,D,E check
    class F decision
    class G success
class H,I error- File Structure: Verifies all required files and directories exist
- Parser Version: Checks compatibility with your CYPEX parser version
- Data Conflicts: Identifies conflicts with existing applications, roles, users, or data
- Performance: Estimates import duration and resource usage
If Validation Passes:
- The import process starts automatically
- You can monitor progress in the real-time log stream
- Validation results are displayed showing any warnings or recommendations
If Validation Fails:
- Errors are displayed with detailed information
- Review the validation results to understand what went wrong
- Check the import logs for additional details
- Common issues include parser version incompatibility, file structure problems, or data conflicts
- Fix the issues and try uploading again
The validation result includes a recommended action: Proceed, Review, or Abort.
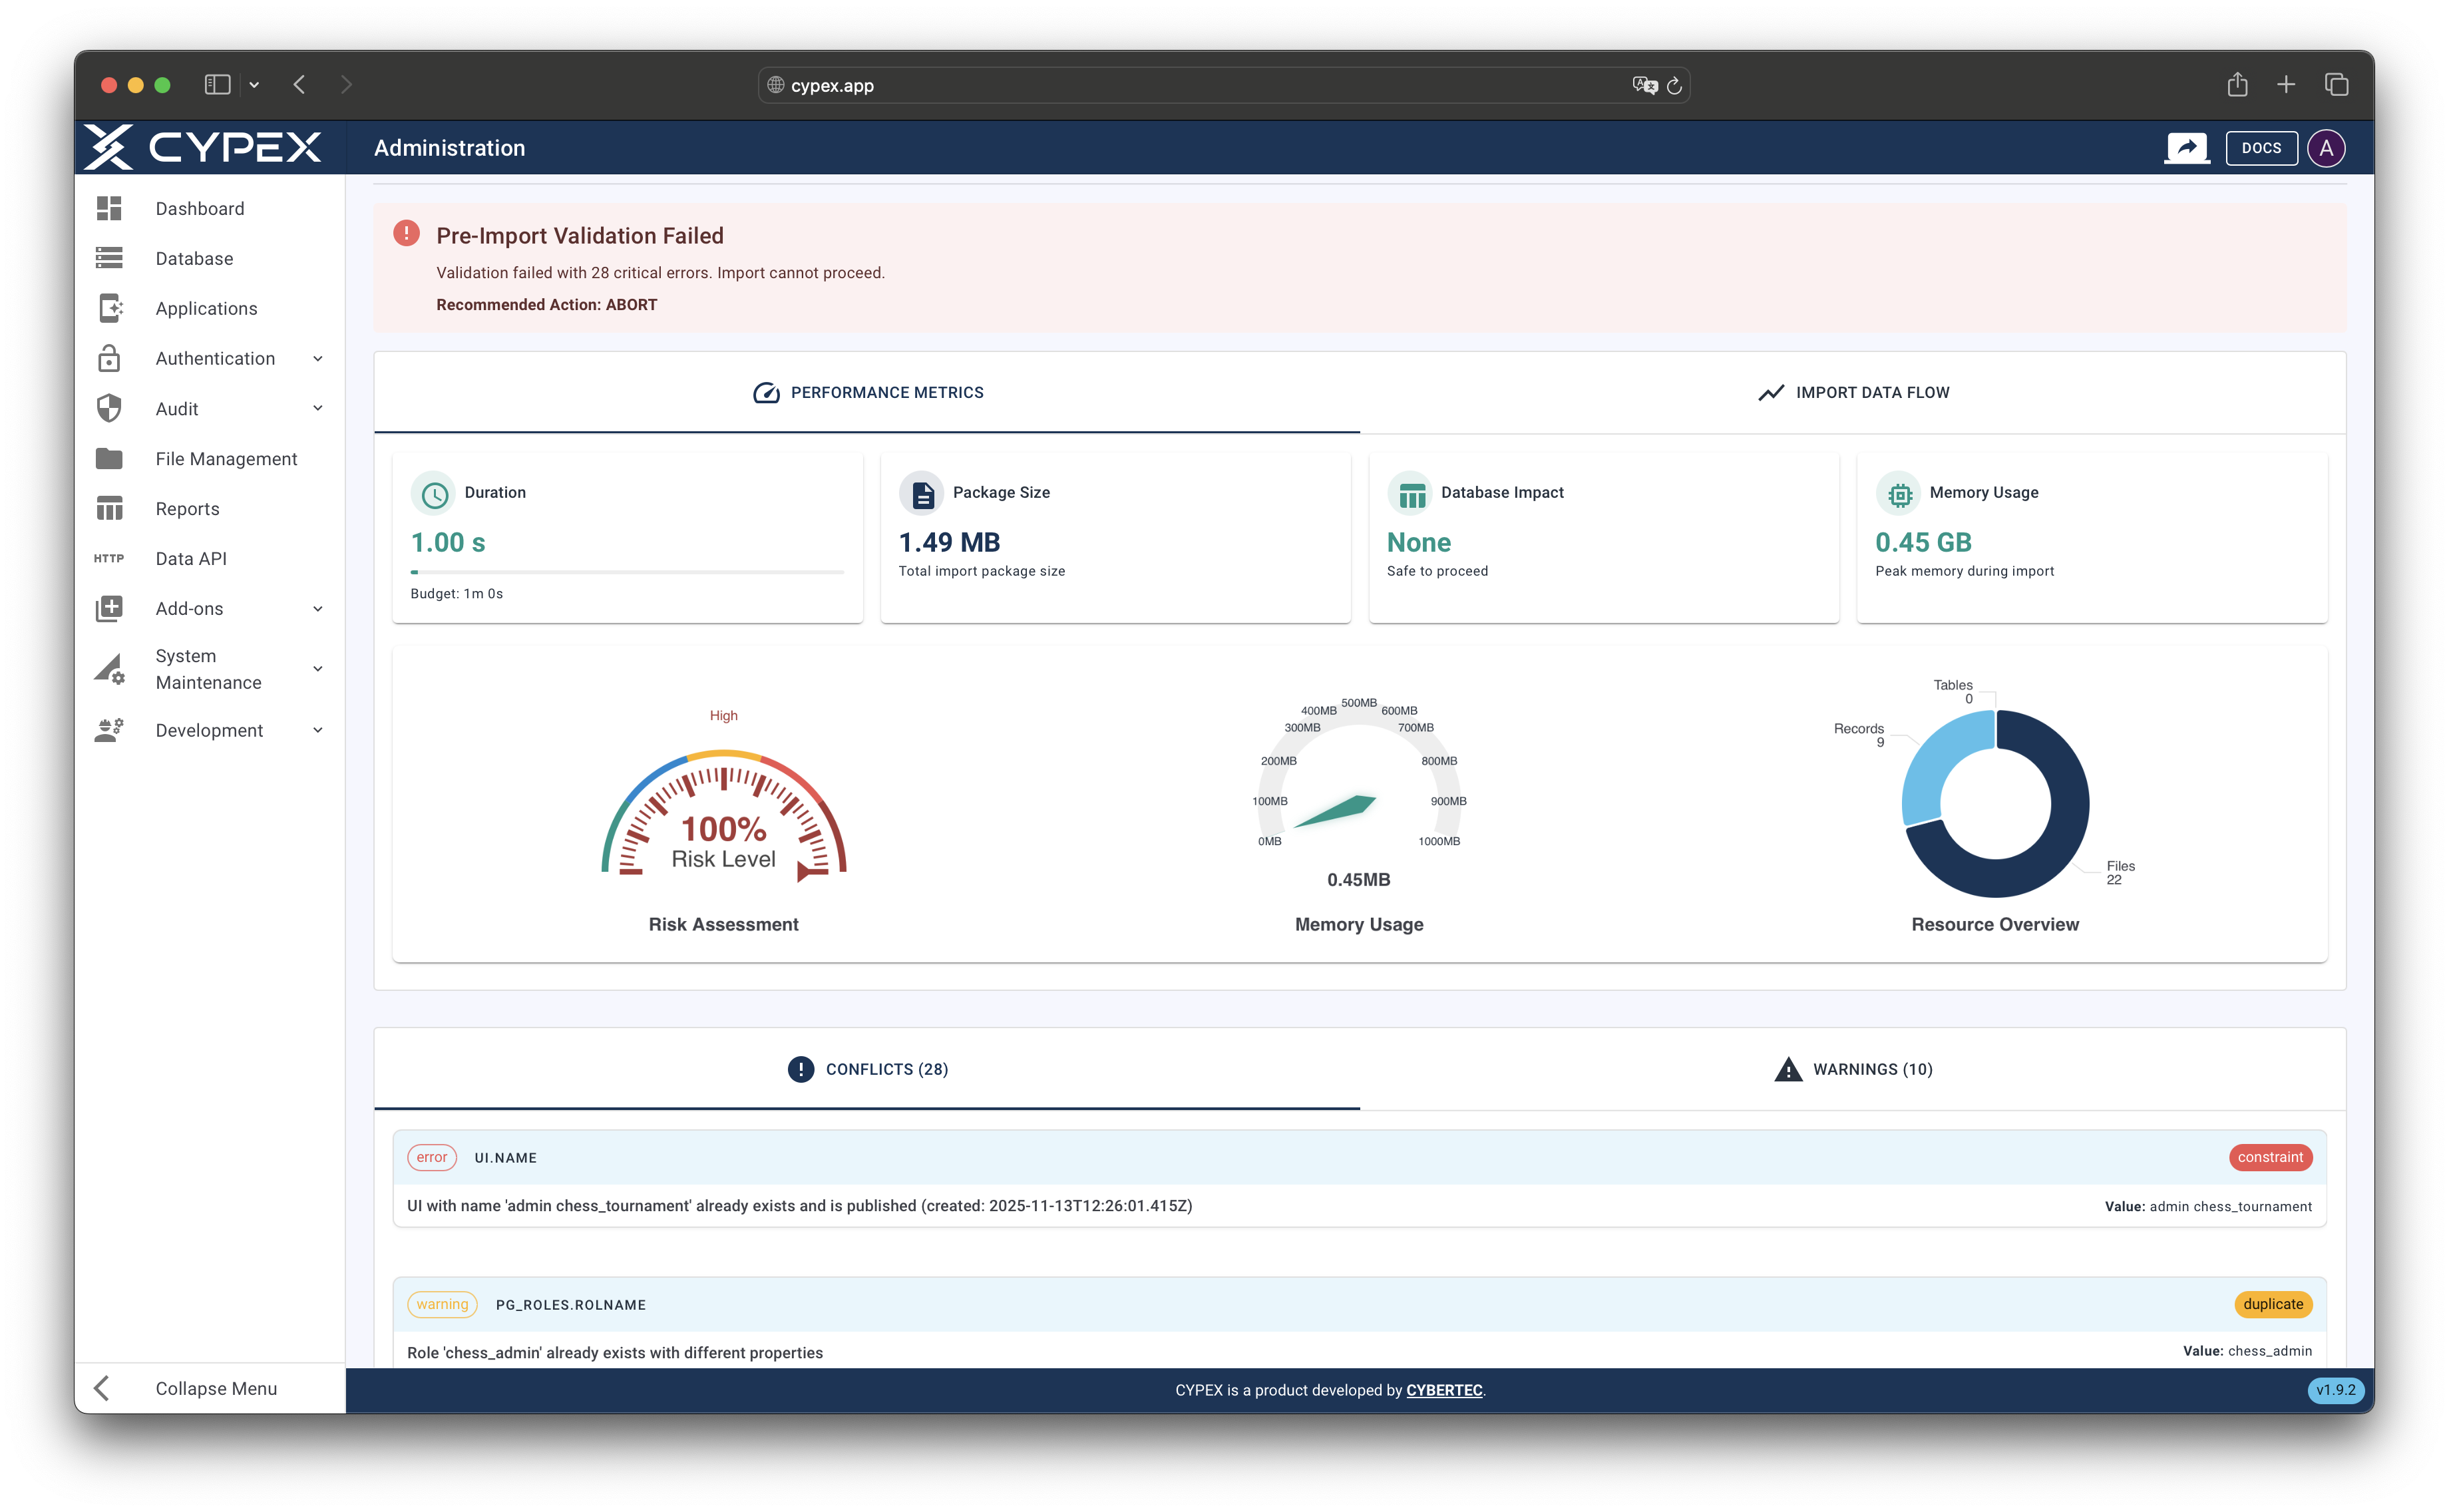
Validation results with conflicts and warnings
Review validation results showing conflicts, warnings, and recommendations
A dry-run simulates the entire import process without making any database changes. This helps you understand exactly what will happen during import.
- Click Run Dry-Run
- The system simulates each import step
- Review the dry-run results:
- Estimated Duration: How long the import will take
- Affected Tables: Which database tables will be modified
- Record Counts: Number of records that will be imported
- Risk Level: Assessment of import risk (Low, Medium, High, Critical)
- Step-by-Step Simulation: Detailed breakdown of each import operation
Dry-run results include visual charts and metrics to help you assess the import impact.
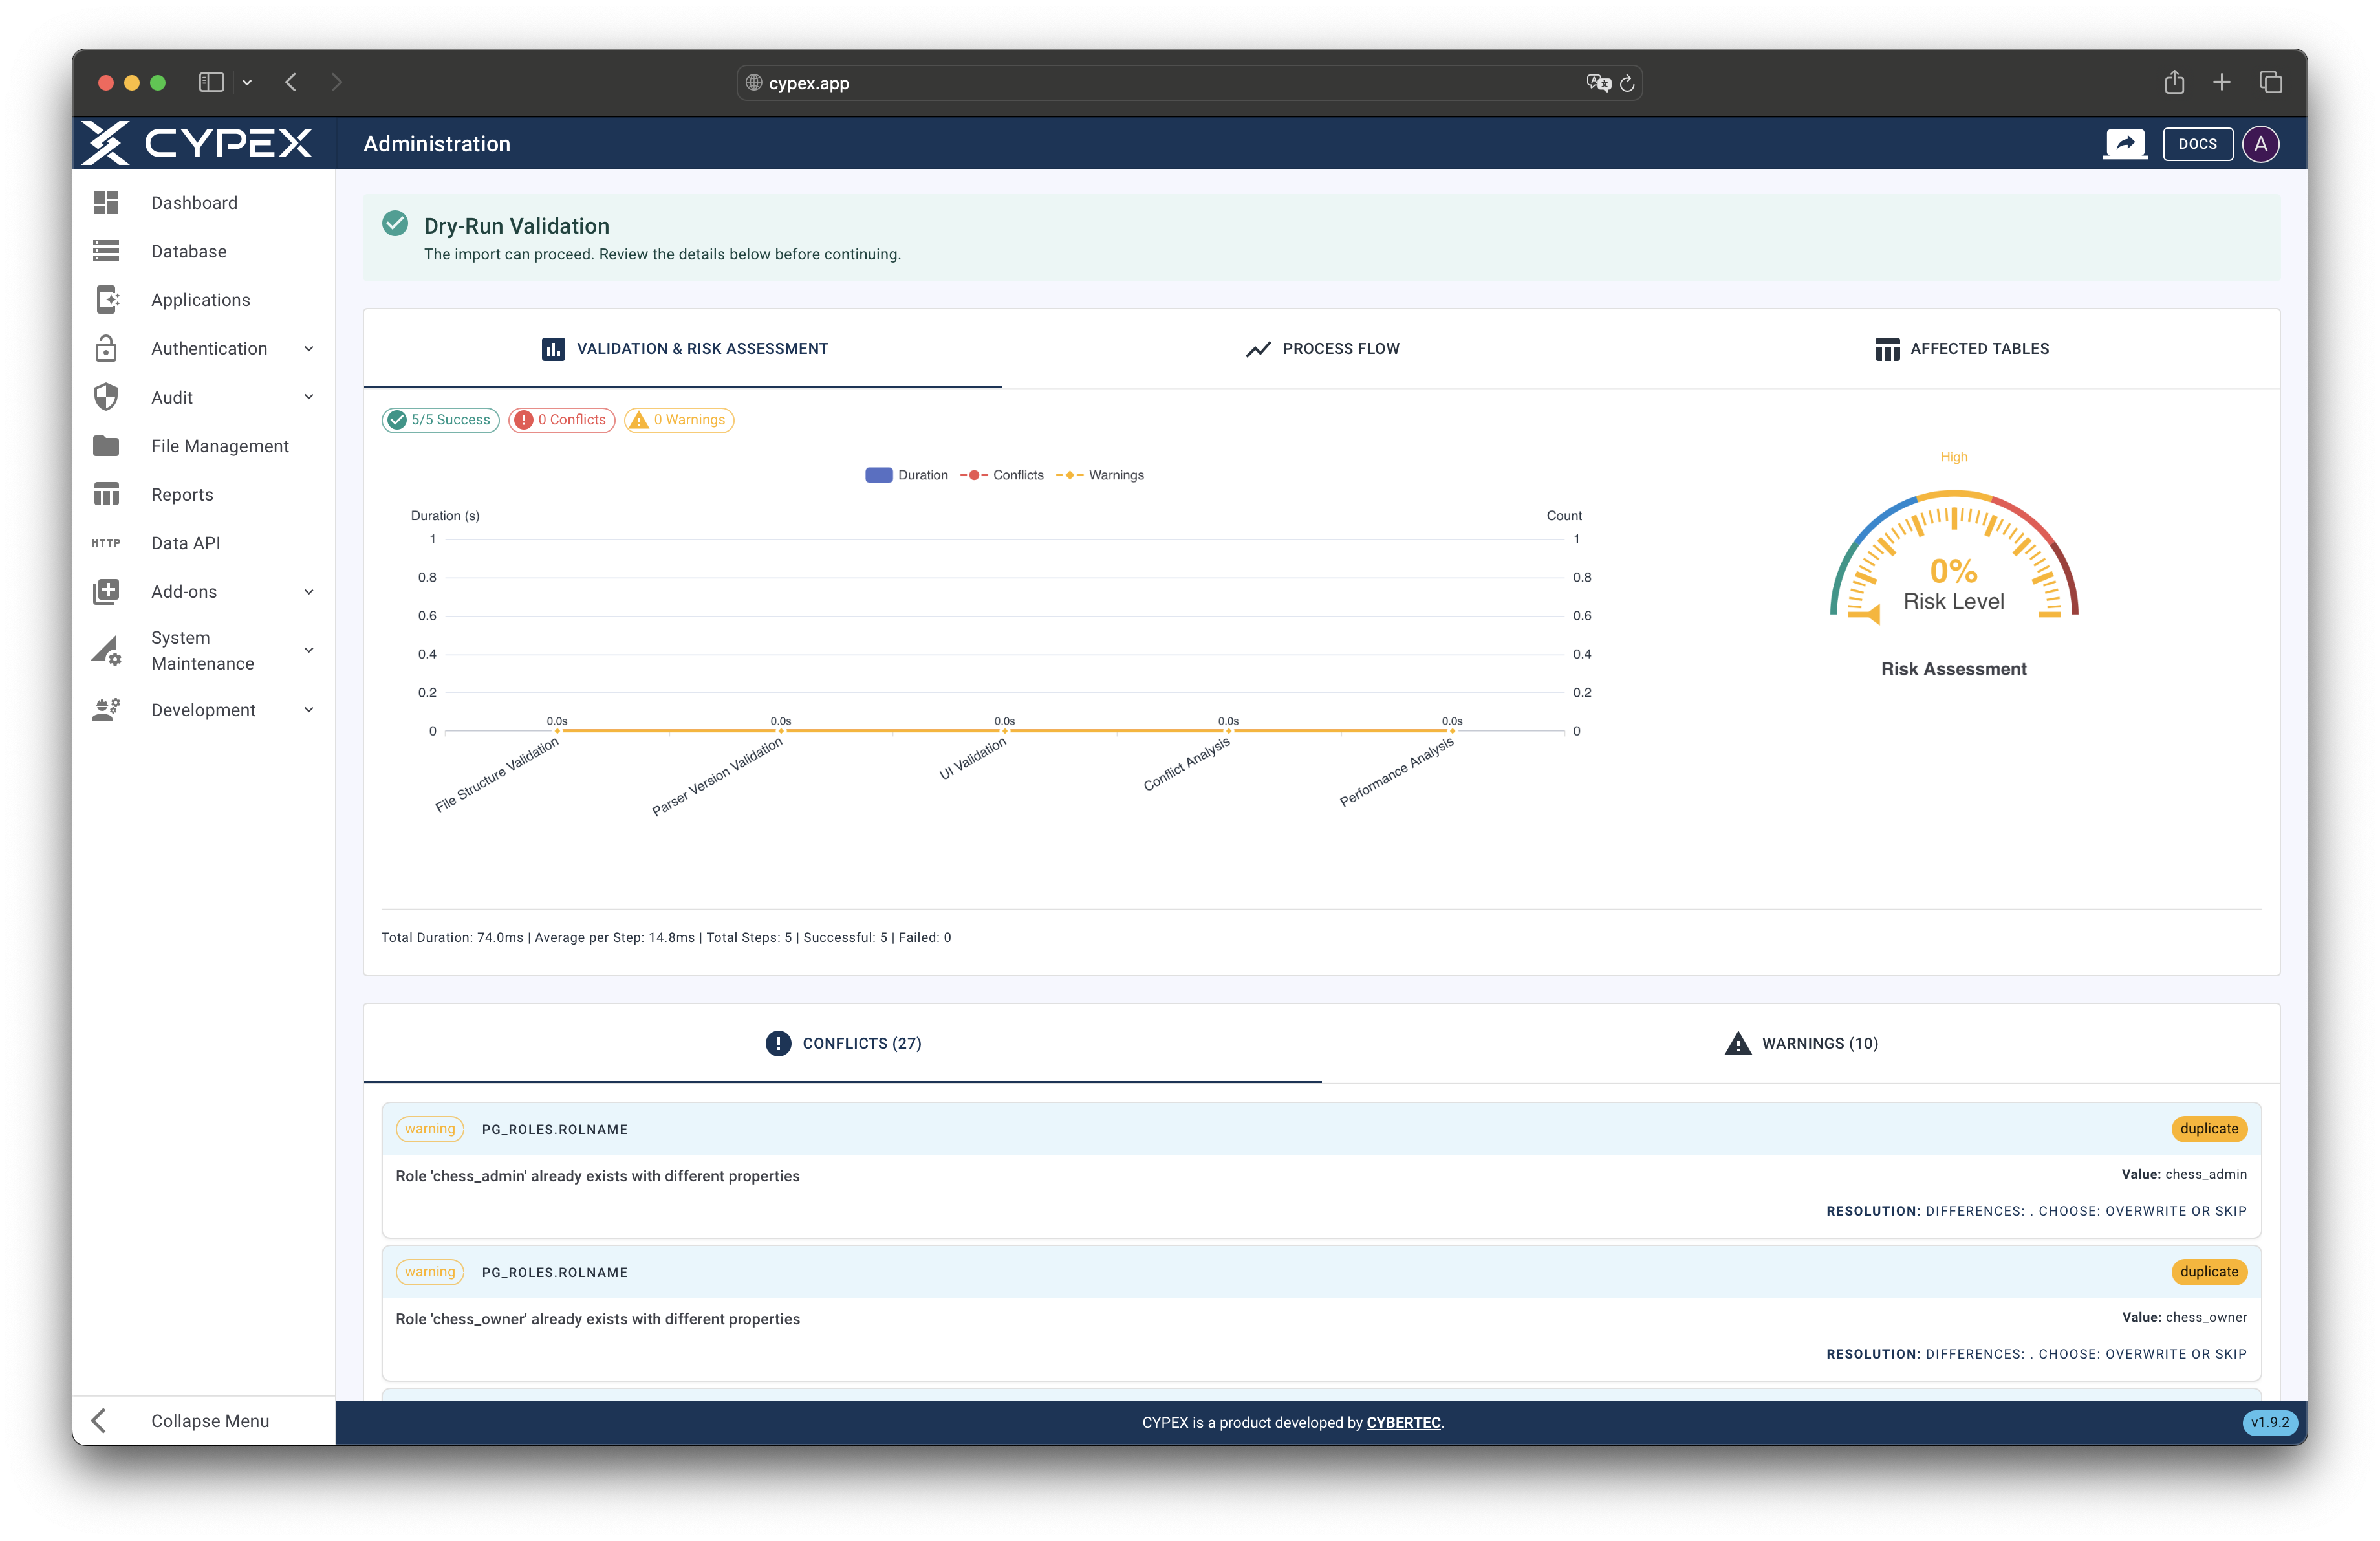
Dry-run results dashboard
Review dry-run results with charts, metrics, and step-by-step breakdown
Automatic Import:
- If validation passes automatically, the import starts immediately
- Monitor the progress in the real-time log stream
- The import may take several minutes depending on size
Manual Import (After Dry-Run):
- If you ran a dry-run first, you can execute the import manually
- Click Start Import (or Execute button) to begin
- Monitor the progress in the real-time log stream
The import process executes these steps in order:
- Import roles and permissions
- Import user accounts
- Import UI definitions
- Import data models, queries, and objects
- Import functions
- Import files
- Import reports
- Import audit logs (if included)
WarningCritical: Do not close the browser or navigate away during import. The import process requires an active session. If the import fails, detailed logs are available for review to identify and resolve the issue.
Import progress with log stream
Monitor import progress in real-time through the log stream
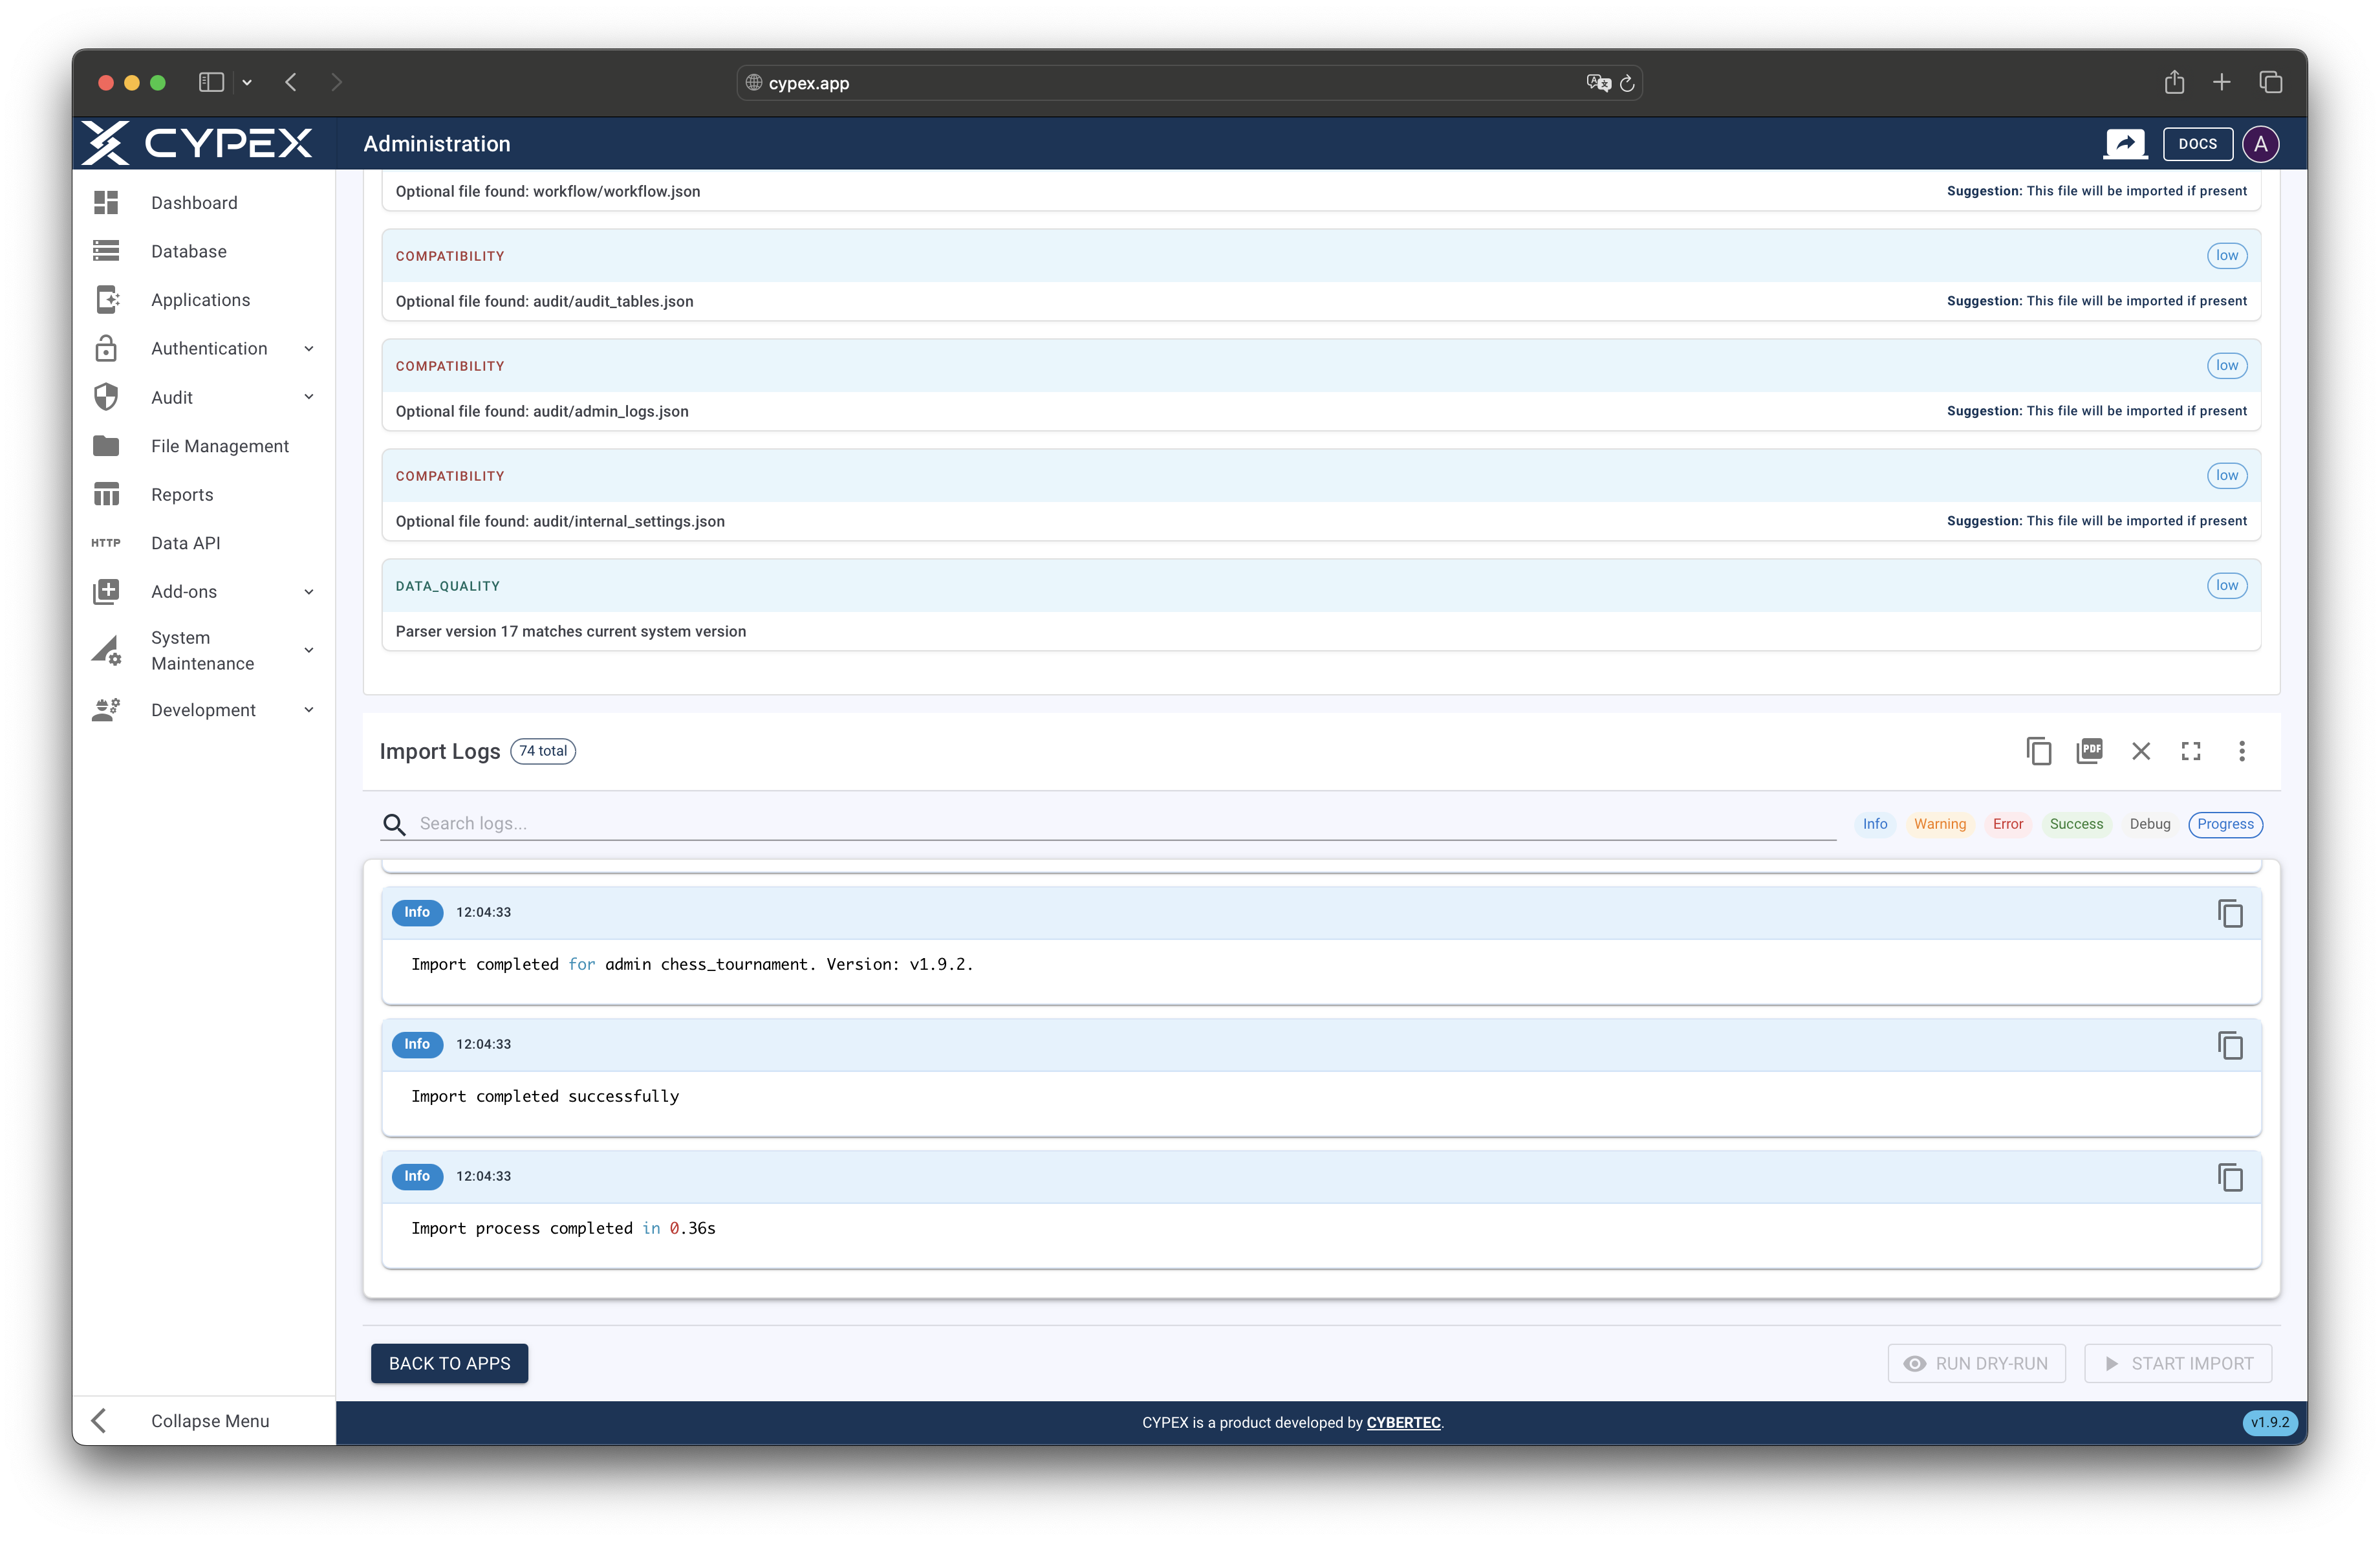
After the import completes:
- Check Logs: Review the import logs for any errors or warnings
- Verify Application: Navigate to Applications to confirm the imported application appears in the list
- Test Functionality: Open and test the application to ensure all features work correctly
- Verify Data: Check that data, queries, workflows, and other components are functioning as expected
If issues are found, review the import logs and validation results to identify the cause.
An exported application package is a ZIP archive containing organized JSON files and metadata. Understanding the structure helps with troubleshooting and manual inspection.
application-package.zip
├── metadata.json              # Application metadata (name, version, export info)
├── import_config.json         # Import configuration and settings
├── checksums.json             # SHA-256 checksums for file integrity verification
├── README.md                  # Human-readable export information
├── schemas/                   # Zod validation schemas (if integrity verification enabled)
│   ├── ui/
│   ├── admin/
│   └── ...
├── ui/
│   └── ui_definition.json     # Complete UI definitions (pages, layouts, elements)
├── admin/
│   ├── roles.json            # Role definitions and grants
│   └── users.json            # User accounts and mappings
├── cypex/
│   ├── cypex_data.json       # Data models, queries, objects, fields, modules
│   └── functions.json        # Custom functions and stored procedures
├── files/
│   └── files_data.json       # File metadata and binary content references
├── reports/
│   └── reports_data.json     # Report definitions and configurations
├── workflow/
│   └── workflow_data.json    # Workflow definitions and state transitions
└── audit/                     # Optional: Only included if "Include System Data" is enabled
    ├── audit_tables.json     # Table audit trail data
    ├── admin_logs.json       # Administrative action logs
    └── internal_settings.json # Internal CYPEX settings
TipManual Inspection: You can extract and inspect the ZIP file manually. All data is stored as JSON format for readability and version control compatibility. This makes export packages suitable for Git repositories and manual review.
During import, conflicts occur when imported data conflicts with existing data in your CYPEX instance. The automatic validation step identifies all conflicts before the import begins or proceeds.
- Application Name: An application with the same name already exists
- Role Names: Roles with identical names exist
- User Accounts: Users with the same email or login name exist
- Object Definitions: Data objects (tables, queries) have conflicting structures
- Parser Version: Incompatible parser versions between export and import environments
Choose the appropriate strategy based on your needs:
Prompt: System pauses at each conflict and asks you to resolve it manually. Use this for critical imports where you need full control.
Overwrite: Existing data is automatically replaced with imported data. Use this when you want to update existing applications with new versions.
Skip: Conflicting data is skipped, keeping your existing data unchanged. Use this when you want to preserve existing data and only import new items.
TipBest Practice: Always review validation results to understand conflicts before choosing a resolution strategy. For production imports, prefer “Prompt” mode to maintain full control over conflict resolution and ensure data integrity.
- Regular Backups: Export applications regularly as part of your backup strategy. Schedule exports for critical applications.
- Meaningful Version Tags: Use semantic versioning (e.g., “1.0.0”, “2.1.3”) or descriptive tags (e.g., “production-2025-10-15”) for easy identification.
- Document Changes: Always add notes explaining what changed, why, and any special considerations for the import.
- Selective Components: Only export components you need. Excluding audit logs and system data significantly reduces package size.
- Test Before Production: Test exports in a development environment first to ensure the package structure is correct.
- Review Automatic Validation: Validation runs automatically, but always review the results before the import proceeds. Check for conflicts and warnings.
- Use Dry-Run for Large Imports: For complex or large applications, run a dry-run before executing to understand the full impact.
- Backup Before Import: Create a full database backup before importing, especially in production environments.
- Review All Conflicts: If validation shows conflicts, review them carefully. The import may fail or produce unexpected results if critical conflicts exist.
- Monitor Logs: Watch the import logs in real-time. If validation fails or errors occur during import, you’ll see them immediately in the logs.
- Test Thoroughly: After import, test all application features, workflows, and data access to ensure everything works correctly.
- Environment Compatibility: Ensure target environment has compatible CYPEX and parser versions. Check validation results for version compatibility warnings.
- Staged Migration: For large applications, consider migrating in stages (e.g., roles first, then data, then UI).
- User Communication: Inform users about scheduled migrations and expected downtime.
- Rollback Plan: Have a documented rollback procedure. Know how to restore from backup if the import fails.
- Test Migration Path: Test the complete migration process in a staging environment that mirrors production.
Problem: Export fails with “Export job already in progress”
Cause: Another export for the same application is currently running.
Solution:
- Wait for the current export to complete
- Check the export status page to see progress
Problem: Export file is too large
Cause: Including all components, especially audit logs and system data, creates very large packages.
Solution:
- Exclude unnecessary components (uncheck “Include System Data” in import configuration)
- Use selective export: only include components you actually need
Problem: Export takes a very long time
Cause: Large applications with many components require significant processing time.
Solution:
- This is normal for large applications. Monitor the log stream for progress
- Ensure adequate server resources (CPU, memory, disk I/O)
- Consider exporting during off-peak hours
Problem: Validation fails automatically with parser version incompatibility
Cause: The export was created with a different CYPEX parser version than your current installation.
Solution:
- Check the validation error message and logs for the specific parser version required
- Update your CYPEX installation to a compatible version
- If versions are too far apart, contact support for migration assistance
- The import will not start automatically if validation fails
Problem: Validation fails or import fails with conflict errors
Cause: Existing data conflicts with imported data. If validation detects critical conflicts, the import may not start automatically, or if it starts, it may fail during execution.
Solution:
- Review detailed conflict information in the validation results and logs
- Change conflict resolution strategy in import settings (e.g., from “Overwrite” to “Prompt” or “Skip”)
- Manually resolve conflicts by modifying existing data before re-importing
- Consider importing to a clean environment first, then merging
- If validation passed but import failed, check the import logs for specific conflict details
Problem: “Session not found” error
Cause: The import session expired or was never created.
Solution:
- Import sessions expire after 1 hour of inactivity
- Ensure you successfully uploaded the file and saw the session created
- Upload the file again to create a new session
- If using tmp folder import, verify the file still exists in the temporary directory
Problem: Import takes too long or appears stuck
Cause: Large imports require significant processing time, or there may be a performance bottleneck.
Solution:
- Check database performance and connection
- Review import logs for specific steps that are slow
- Consider using “Batch” transaction mode instead of “Per-object” for better performance
- Ensure adequate database resources (connections, memory)
Problem: Import completes but application doesn’t appear
Cause: Import may have failed silently or application name conflicts weren’t resolved.
Solution:
- Check import logs for any errors or warnings
- Verify the application name doesn’t conflict with existing applications
- Check that all import steps completed successfully in the logs
- Try importing with a different application name if name conflict exists
The Export/Import feature includes several security measures:
- Administrator-Only Access: Only users with administrator privileges can export and import applications
- File Validation: All uploaded files are validated for type, size, and content integrity
- Path Traversal Protection: Filenames are sanitized to prevent directory traversal attacks
- Session Management: Import sessions automatically expire after 1 hour of inactivity to prevent unauthorized access
- Audit Logging: All export and import operations are logged with user information, timestamps, and details for compliance and troubleshooting
WarningSecurity Note: Export packages contain sensitive application data including user accounts, permissions, and potentially confidential business data. Always store and transfer export files securely using encrypted channels. Never share export packages through unsecured channels or public repositories without proper access controls.
The maximum file upload size for imports can be configured via the MAX_IMPORT_FILE_SIZE environment variable. The default is 100MB (104857600 bytes).
Docker Compose Configuration:
Add the environment variable to your docker-compose.yml:
| |
Kubernetes Configuration:
Add to your deployment YAML:
| |
InfoConfiguration Note: The value must be specified in bytes. Common values:
- 100MB = 104857600 bytes
- 200MB = 209715200 bytes
- 500MB = 524288000 bytes
- File Size Limit: Maximum upload size is 100MB per file by default (configurable via
MAX_IMPORT_FILE_SIZEenvironment variable) - Session Timeout: Import sessions expire after 1 hour of inactivity. Complete imports within this timeframe or re-upload the file
- Concurrent Exports: Only one export per application can run at a time to prevent conflicts
- Parser Version Compatibility: Imports require compatible CYPEX parser versions. Check validation results for version requirements
- Database Extensions: Some imports may require specific PostgreSQL extensions. Ensure all required extensions are installed
- Transaction Rollback: If using “Full” transaction mode and import fails, the entire import is rolled back. Use “Batch” mode for better error recovery
The Export/Import feature integrates with several other CYPEX capabilities:
- Release Management: Export and import work seamlessly with application releases. You can export specific releases or create new releases during import
- Merge Applications: Imported applications can be merged with existing applications using the Merge Applications feature
- Git Integration: Export packages can be automatically pushed to Git repositories if configured in the export settings
InfoGit Integration: Automatic Git repository push functionality is planned for a future release. Currently, export packages must be manually committed to Git repositories after download. The JSON format of export packages makes them ideal for version control.
- Backup Strategies: Export/import is a core component of application backup and disaster recovery strategies
For more information on related topics:
- Release Management - Learn about application versioning and releases
- Administration Panel - Overview of administrative features
- Merge Applications - How to combine multiple applications
Browse Documentation by Topic: